


How to Draft a Woven Skirt Block
Today, I'm sharing two ways to draft a basic woven skirt block—one very simple and one more advanced.

Welcome to Sewing With Numbers, a newsletter about sewing, math, design and how to draft your own sewing patterns. Through simple pattern drafting exercises, I'll show you how fun, useful and empowering math can be. ✂️ Posts older than 3 months are archived for paid subscribers. But if subscriptions aren’t your thing, I also have PDF Booklets for older projects in my shop.
Hello! My apologies for sending this week's newsletter out late. I had planned to devote Friday to it but was struck down by migraine. It's so hard to think clearly with migraine! But, I'm feeling better now. If pain and illness can teach us anything, it's to appreciate the good days.
I also want to share that on my other blog, I'm featuring my Miri Tank Top pattern this month with a brand new step-by-step sewalong. The tank top is designed for woven fabric and is a great pattern for practicing sewing skills like interfacing, facings, understitching, etc. It also comes with 3 cup size options for all sizes so you're less likely to need to do a bust adjustment. This last week I posted two new posts—one about Fabric & Supplies and one on How to Select Your Size and Print the Pattern at Home. It’s a great pattern to kick off your summer sewing!
Ok, on with the show! This is the first tutorial in our Woven Skirt Series (aka Project 009)—the woven skirt block. The great thing about having your own custom skirt block is that you can adapt it into SO MANY other designs.
In this post, I’m sharing two ways to to draft your own custom skirt block. The first method is very straightforward with a little less nuance. The second requires more measurements and gives a more custom fit. You can think of it as beginner and advanced options.
I’m going to share the two drafting methods first. Then, I have some notes on different details from the three drafting books I use most often. Just in case you’re interested in how other folks do it. Let’s get started!
HOW TO DRAFT A SKIRT BLOCK—METHOD ONE (BEGINNER)
A couple of notes before we start. For the block, we won’t be adding the seam allowance, hem allowance and waistband pattern piece. For this beginner method, the front and back pattern pieces are the same and we are making two darts in both the front and back that are each 1” wide and 5” long. See the Resources section at the end for more options.
Part 1: Collect Information
I’ve assigned a representative letter to each number we’ll need. I’ll use these letters to write the drafting formulas. When drafting your skirt, you’ll replace the letters with your own numbers.
A Waist Circumference Measure the body circumference where you want the waist of the skirt to sit. This may or may not be the “natural” waist.
B Hip Circumference Measure the circumference of the largest part of the hips.
C Ease at Waist This is the total ease at the waist, after sewing. This is designer’s choice. Personally, I like 1” (2.5cm).
D Ease at Hip This is the total ease in the hips. Most blocks use 2” or 5-6cm but it’s up to you.
E Waist to Hip Vertical distance from the waist (position determined in measurement A) to the largest part of the hips. This measurement is not taken over the curve of the body. Think of it as measuring that section of your height, perpendicular to the floor.
F Waist to Knee This block makes a knee length skirt but the length is ultimately the designer’s choice.
Part 2: Draft the Pattern—Method One
This pattern piece is one-fourth (aka a quarter) of the body so we’ll be dividing our desired finished measurements by 4. There will be a total of 4 darts, each 1” wide.
STEP 1: Draw a rectangle for the body of the skirt. The width of the rectangle is the sum of B Hip Circumference plus D Ease at Hip divided by 4, or (B+D)/4. The length of the rectangle is F Waist to Knee. Mark the center front/back fold on the right side of the rectangle.
STEP 2: Add waist shaping Here we’ll draw the curve for the top of the side seam and the waistline. Shown in blue in the graphic above left.
On the top edge, mark a point for the waist seam that is A Waist Circumference plus C Ease at Waist divided by 4 plus 1”, or (A+C)/4+1" away from the right side. The waistline seam is one-fourth the finished waist circumference (body plus ease) plus 1” for the dart intake.
Mark a second point on the left side of the rectangle E Waist to Hip down from the top. Connect the two points with a curved line.
STEP 3: Add the waist dart Mark the midpoint/center of the waistline seam. This is the center of the dart. Draw a 5" line down from the center waist for the dart length.
Mark 1/2" from each side of the point for the ends of the dart. Connect the dots to draw a dart that is 1" wide by 5" long.
Here’s an example of what the finished block would look like with seam and hem allowance. As with all patterns, you’ll need to test and tweak the fit for your own custom fit.
HOW TO DRAFT A SKIRT BLOCK—METHOD TWO (ADVANCED)
For this approach, you'll need to take body measurements for both the front and back of the body—as opposed to the entire circumference. It might be easiest to have a friend help you take measurements. Or, you can create a visual guide by tying pieces of elastic at the waist and hip points. Then using a fabric pen, mark your ideal side seam location on the elastic. Then measure with a flexible measuring tape using the elastic as a guide.
This method is similar in concept to when we drafted the knit skirt with separate front and back pattern pieces. Link below.

In the graphic above are two example bodies. In example 1 the bum is curvy with a smaller waist. In example 2, the tummy is curvy with a narrower hip. The gray line represents the side seam and is placed in the middle of the leg. The red line represents the waist measurement and the blue line represents the hip. The dots on the side seam show where you will start and stop measuring.
If you have a curvier tummy and narrow hips like in Example 2 and the Front Waist is larger than the Front Hip, I recommend using the Front Waist measurement for the Front Hip measurement. This will help the skirt hang straight down from the waist. This blog post from Itch To Stitch does a good job of explaining this idea.
Part 1: Collect Information
A Front Waist Measure the front waist where you want the waist of the skirt to sit. This measurement is taken side seam to side seam.
α Back Waist Measure the back waist where you want the waist of the skirt to sit.
B Front Hip This measurement is taken side seam to side seam. See graphic above.
β Back Hip This measurement is taken side seam to side seam. See graphic above.
C Ease at Waist This is the total ease at the waist, after sewing. This is designer’s choice. Personally, I like 1” (2.5cm).
D Ease at Hip This is the total ease in the hips. Most blocks use 2” or 5-6cm but it’s up to you.
E Front Waist to Hip Vertical distance from the center front waist point down to the hip point. See graphic above.
ξ Back Waist to Hip Vertical distance from the center back waist point down to the hip point. See graphic above.
F Waist to Knee This block makes a knee length skirt but the length is ultimately the designer’s choice. See graphic above.
G Side Length Waist to Hip Measure the curve along the side body from the waist point to the hip point. See graphic above.
Part 2: Draft the Pattern—Method Two
For this version, we’ll be drafting separate pattern pieces for the front and back creating a more custom fit. For the dart intake, we’ll make a 1” dart in the front pattern piece and two .75” darts in the back pattern piece. See the Resources section at the end for more options.
Note, this pattern is HALF of the Front and HALF of the back so many of the measurements will be divided in half.
STEP 1: For the body of the skirt draw a rectangle with width equal to half of the sum of B Front Hip, β Back Hip and D Ease at Hip and F Waist to Knee long. In math speak the rectangle is (B+β+D)/2 wide and F long.
Mark the Center Front on the right side and Center Back on the left side.
STEP 2: Next mark side seam. On the top edge, mark half β Back Hip plus one-fourth D Ease at Hip, or β/2+(D/4), away from the top left corner. Draw a vertical line to the bottom of the rectangle.
The back hip width of the pattern is β/2+(D/4). The pattern piece is half of the back and β is the measurement of the back, so we divide it by 2. D Ease at Hip is distributed evenly across the front and back so we need to divide by 2 twice, or divide by 4.
The front hip width of the pattern is B/2+D/4, using the same logic as above.
For a little algebraic fun, we can check the math to show that Front Hip + Back Hip = Total Hip as follows.
β/2+(D/4) + B/2+(D/4) = (B+β+D)/2
β/2 +B/2 + D/4 + D/4 = (B+β+D)/2
β/2 +B/2 + D/2 = (B+β+D)/2
(B+β+D)/2 = (B+β+D)/2
STEP 3: Mark the front hip depth. On the right side, mark E Front Waist to Hip down from the top right corner. Draw a horizontal line across to the left side.
STEP 4: Mark back hip depth On the left side, mark ξ Back Waist to Hip up from the horizontal hip line.
STEP 5: Mark front waistline. On the top edge, mark the sum of half of A Front Waist, plus one-fourth C Ease at Waist plus 1, or in short, (A/2+C/4)+1", away from the right corner.
The front waistline width of the pattern is (A/2+C/4)+1". The pattern piece is half of the front and A is the measurement of the front waist, so we divide it by 2. C Ease at Waist is distributed evenly across the front and back so we need to divide by 2 twice, or divide by 4. In this example, we will be drawing a 1” wide dart on the front pattern piece, which is why we need to add 1” to the waistline length.
STEP 6: Mark back waistline. On the top edge, mark the sum of half of α Back Waist, plus one-fourth C Ease at Waist plus 1.5”, or in short, (α/2+C/4)+1.5" away from the left corner. (In this example, we will be drawing two .75” wide darts on the back pattern piece, which is why we need to add 1.5” to the waistline length.)
The back waist width of the pattern is (α/2+C/4)+1.5" using the same logic as above.
Draw vertical reference lines thru the waist points marked in steps 5 and 6.
STEP 7: Draw the curved upper part of the side seam. Starting where the Hip Line and the Side Seam meet, draw a curved line with a length of G that ends with the vertical of the waist line. Repeat for Front.
If you are drawing this line with paper, you can use a curved ruler. Place one end of the ruler at the Hip/Seam line and pivot until the correct length meets the guideline drawn after Steps 5 and 6.
STEP 8: Draw in the waistline curve. On the left side, connect the ξ Back Waist to Hip point to the top of the side seam. On the right side, connect the top right corner to the top of the side seam
STEP 9: Mark halfway in between each waistline. On the back waistline mark .75" on either side of the center point. These are the centers of the darts. Ideally, the darts are centered on the waistline and there is a 1.5” gap between the two back darts.
STEP 10: Draw in the waist darts. On the back waistline, draw 2 darts that are .75" wide by 5" long. On the front waistline, draw one dart that is 1" wide by 3.5" long.
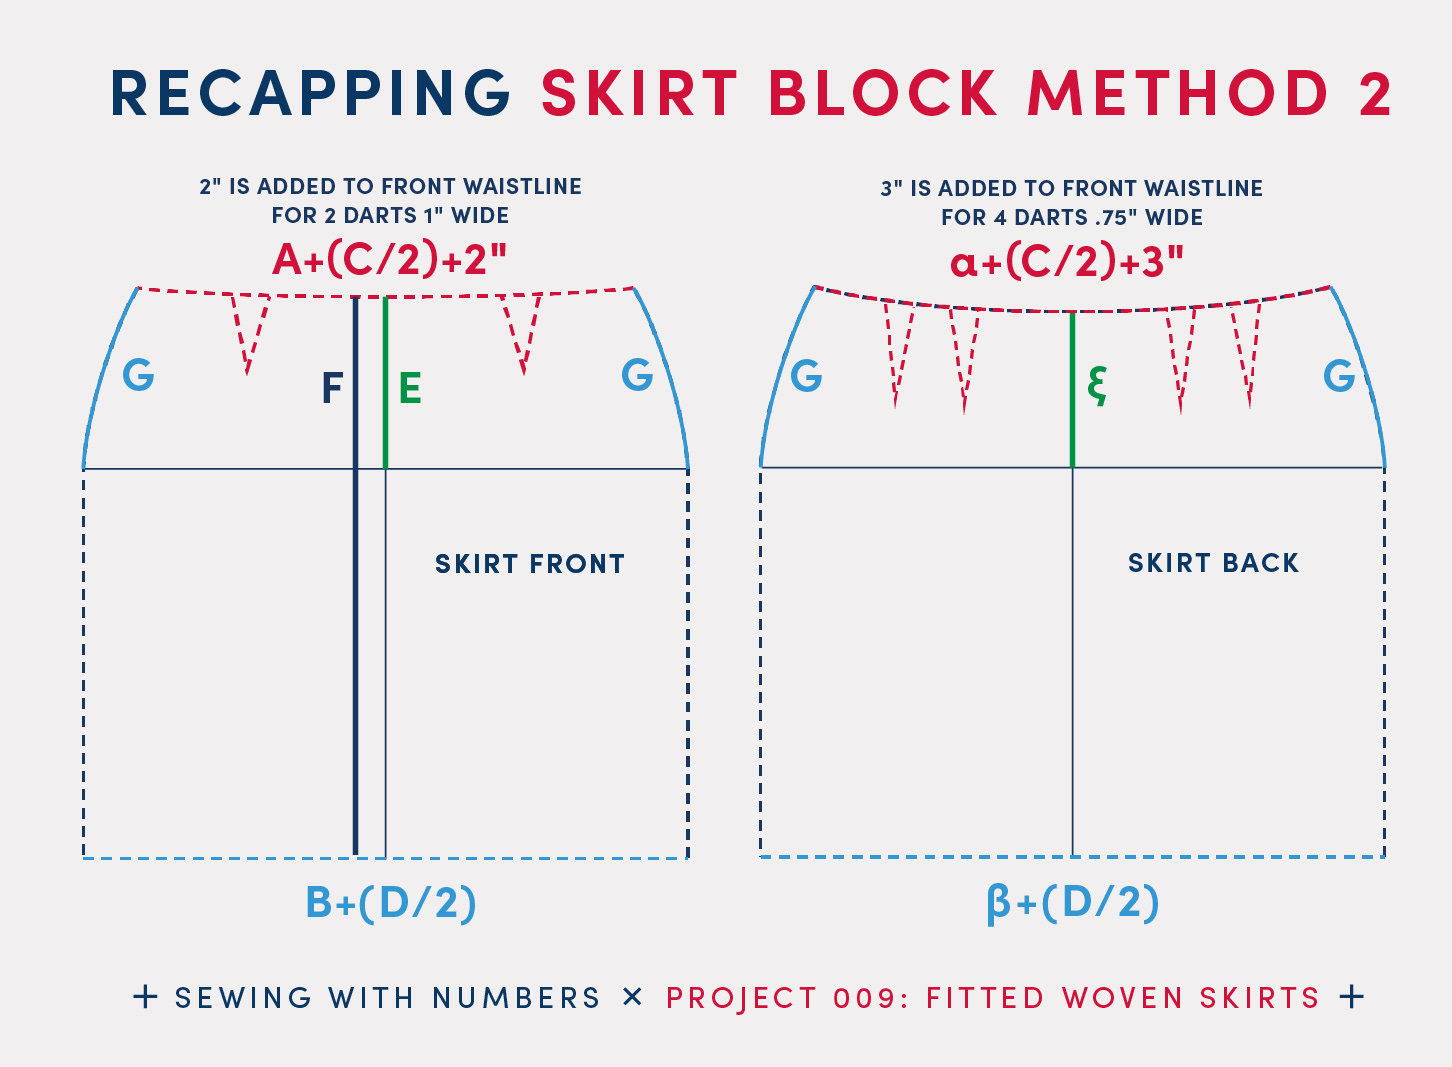
After creating the step-by-step above, I decided to create the graphic above to get a visual for where all the different measurements go in the final pattern. The waist and hips get the custom front and back measurements. The ease (C and D) is divided equally between the front and back. In the front and back, we’ve added 2” and 3” respectively for the dart intake.
The front and back depth, E and ξ, can be seen at the center front and center back. And G side depth is the top part of the side seam on both front and back.
Here’s what the pattern pieces would roughly look like with seam allowance and hem allowance added. This draft uses different pattern pieces for Front and Back with varying hip depth in the center front, center back and side.
Comparison of References
I consulted three different pattern drafting books for this tutorial and (not surprisingly) they all draft a skirt block a little differently. The main difference is in how the darts are drafted. Here are the books I referenced: (links are affiliate links to my Bookshop)
How to Make Sewing Patterns by Donald H. McCunn
Metric Pattern Cutting for Women's Wear by Winifred Aldrich
Patternmaking for Fashion Design by Helen Joseph Armstrong
(Interestingly, these books are listed in order of cheapest to most expensive AND most straightforward to most complicated.)
Creating the darts
Interestingly, all of my pattern drafting books create the darts in different ways. In last week's introduction post, I recommended the McCunn book because it provides the most custom fitting help and is the most approachable. McCunn instructs you to build the skirt block with a little curve at the waist and then try it on to determine your custom darts. This will be the easiest way to get darts that work for your body and reduce how many muslins you need to make. Yay!
In the Aldrich book, they use the same size of dart for all sizes. They use a single 1"/2.5cm dart in the front and two .75"/2cm darts in the back pattern piece. (Total two darts in front and 4 darts in back.) The darts also have non-custom lengths of 12cm, 13cm and 14cm (going from front to back). The back two darts are evenly distributed across the pattern (by dividing the width in thirds). The front dart is one-third of the width from the side seam.
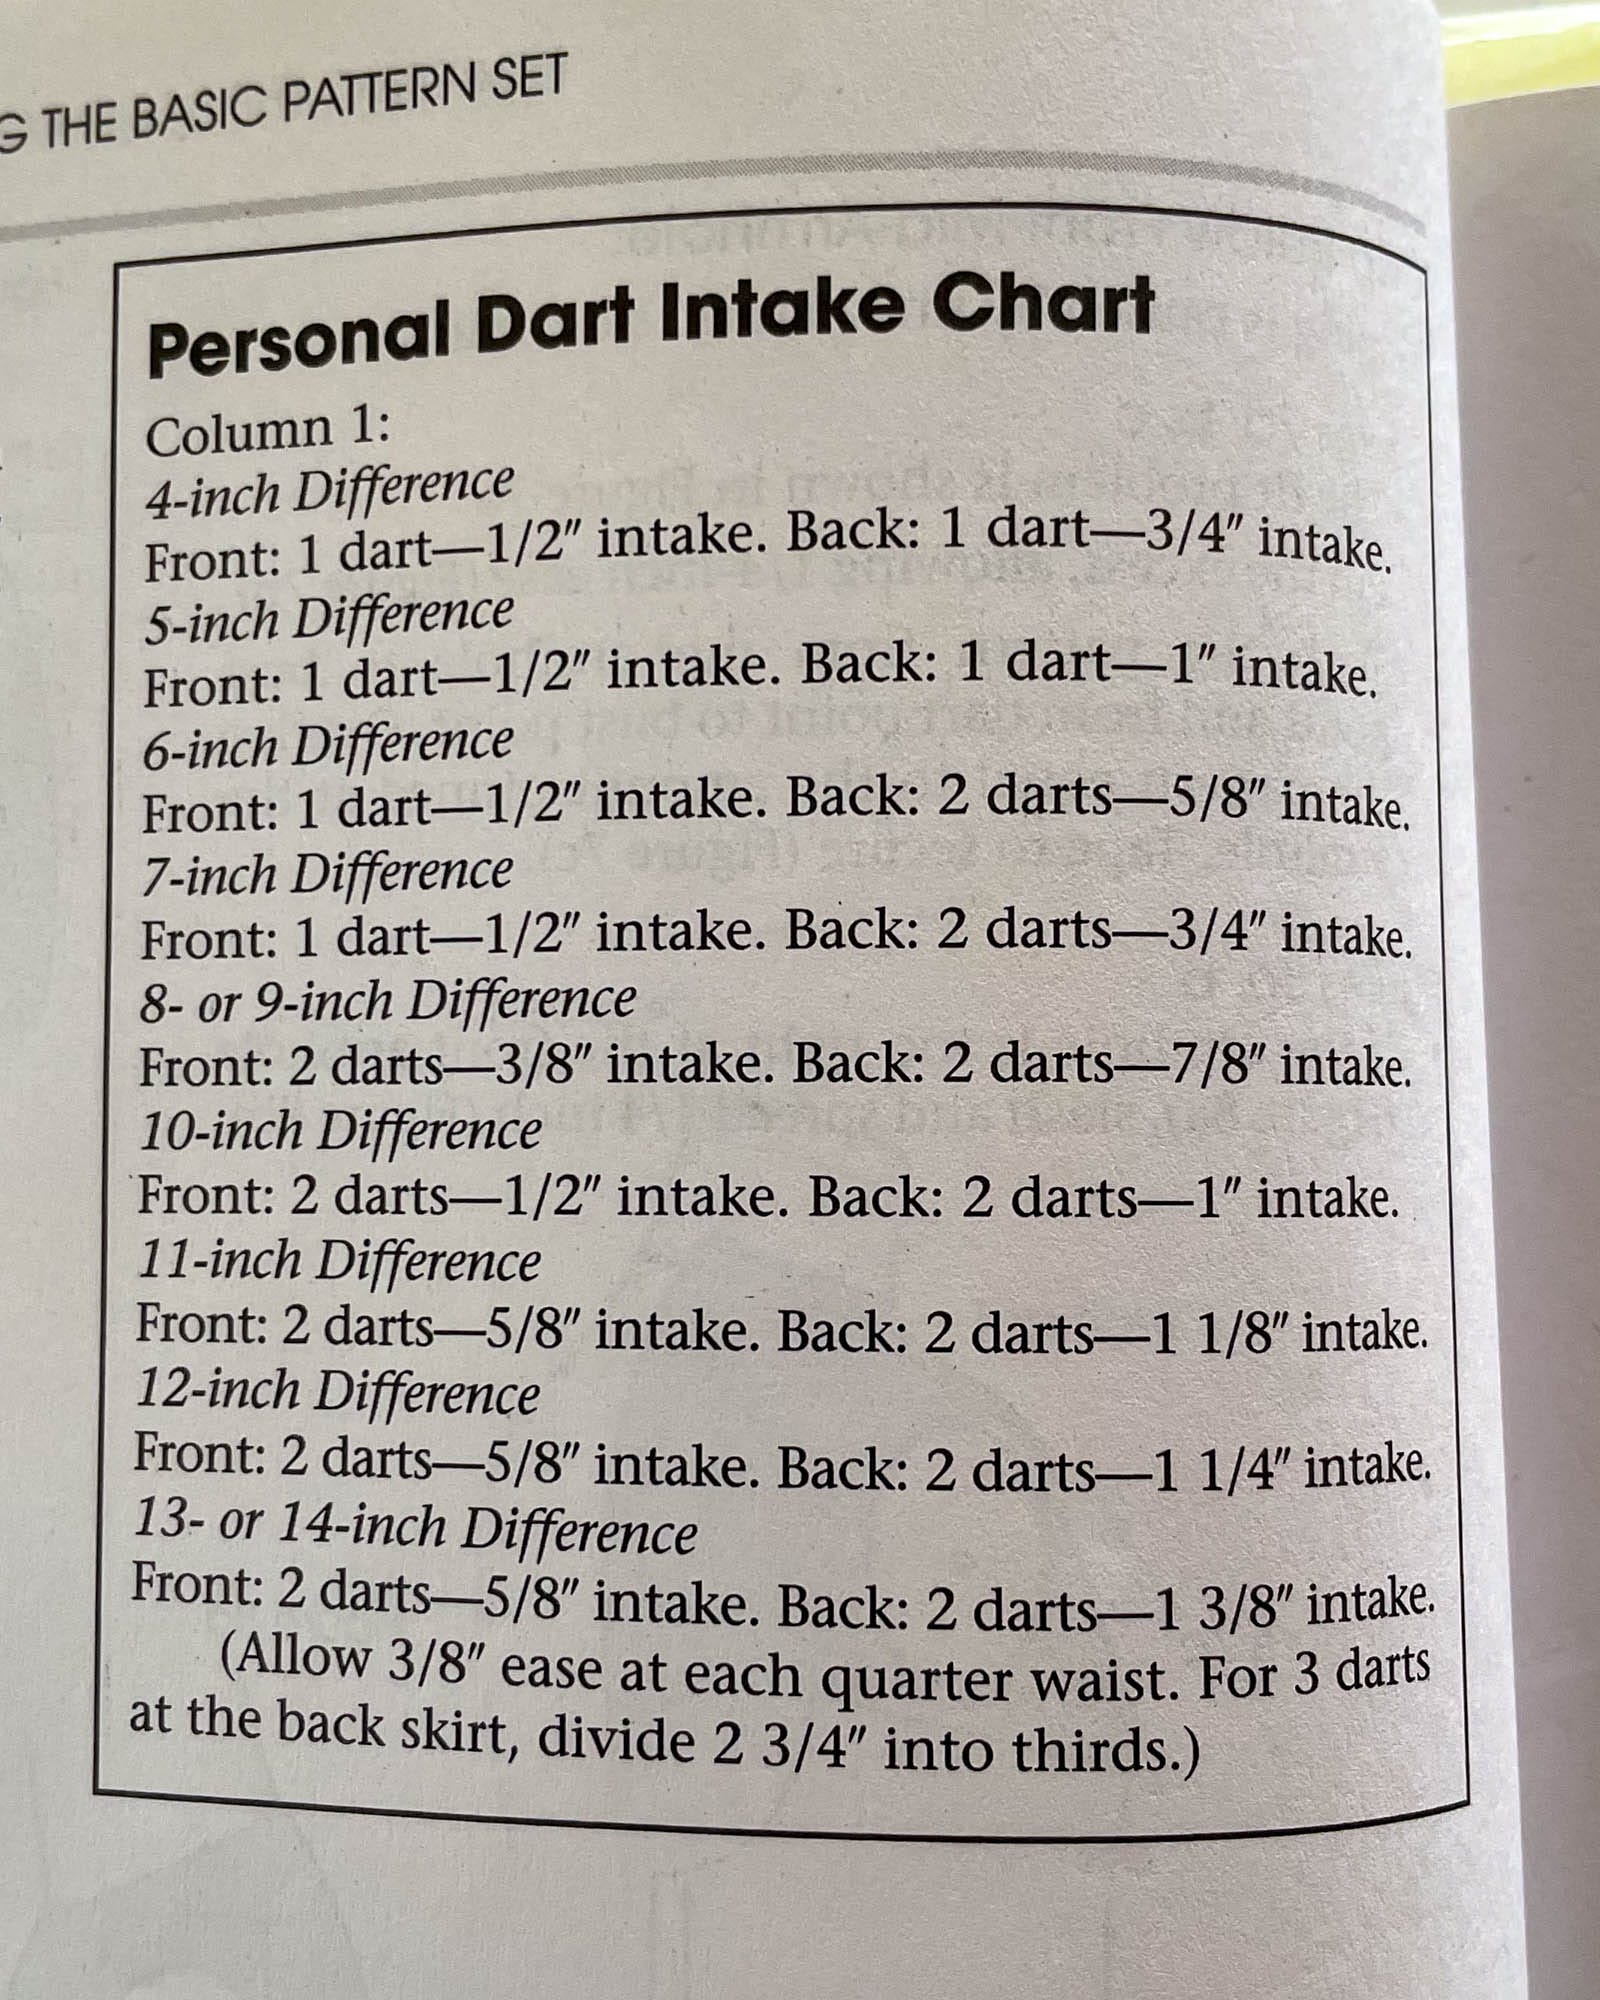
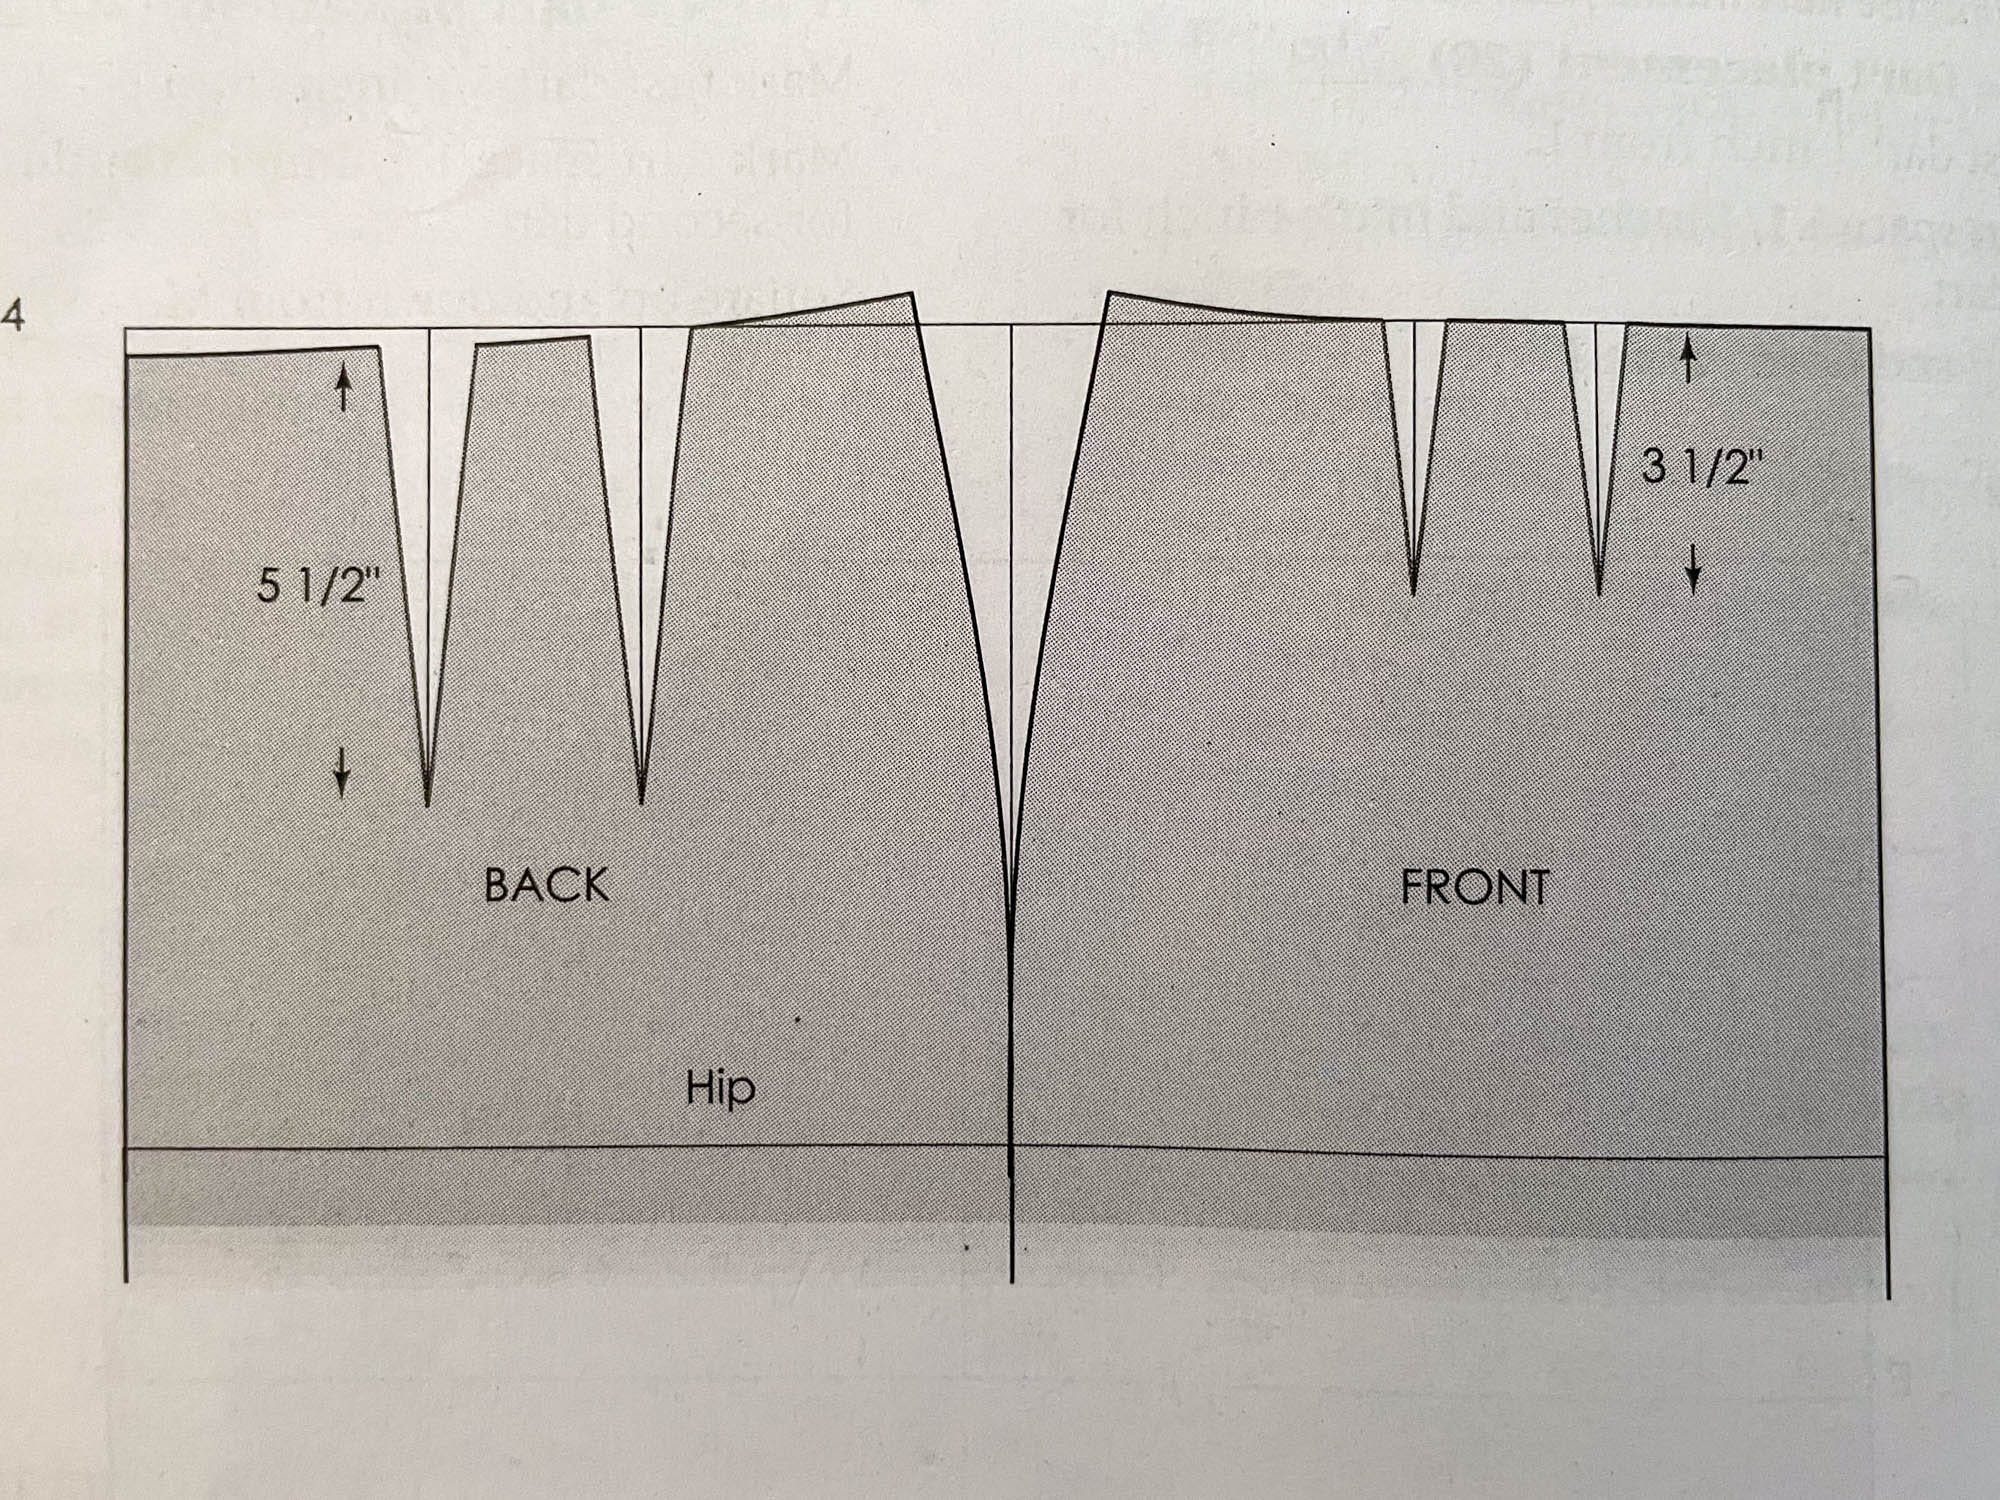
In the Armstrong book, the approach is more customized. They provide a chart (shown above) for the number of darts and width of darts based on the difference of the hip and waist measurements. The bigger the difference, the more dart intake is used. The back darts are 5.5" long and the front darts are 3.5" long. I think this approach makes sense if you're making more than one block and not just making one for yourself.
Waistline curve
Both Aldrich and Armstrong add a curve to the waistline so that it is lower at the center front/back and a little higher at the corner with the side seam. In Aldrich, the side seam corner is raised 1.25cm for all sizes. Armstrong (again) uses more measurements for a more custom fit. The center front/back depth is determined using a body measurement (i.e. Center Front Depth) and the side seam length (from waist to hip depth) equals the body measurement of the Side Hip Depth. (I used Armstrong’s method in the Advanced method above. Admittedly, it is NOT EASY.)
McCunn does not differentiate the front hip depth form the side hip depth.
Ease
In the Armstrong block, there is 1" of total ease at the waist and 2" of total ease at the hips. Aldrich uses 6cm (2.36") ease at hip and no ease at the waist.
McCunn uses 2" of ease at hip and the ease at the waist is determined by the pattern maker when fitting the darts.
Front vs Back measurements
One more note comparing the three methods in this book. McCunn and Aldrich use the circumference of the waist and hip and divide it evenly to create the front and back pattern. Armstrong measures the front and back waist and hips and uses that to draft a more custom fit for the front and back pattern pieces. (Again, I used Armstrong’s approach in the Advanced method above.)
I hope that you enjoyed this tutorial. Please let me know in the comments if you have any questions. Next week, we will use the skirt block to draft a classic pencil skirt.
There are lots of ways to support this free content. You can tap the "heart" at the top or bottom, share or “restack” the post to help other people find it. Become a paid subscriber or, visit one of the links below.
Sewing With Numbers Drafting Manuals are now available for purchase.
Pattern Shop | Improv Quilting E-Course | Donate at Ko-Fi | YouTube
Happy mathing!
Beth
This is amazing. Thank you!
This is an amazing resource. Thank you. I am excited to try it out!