
Project 013: How to draft pleats
In this exercise, I'll show you how to draft three different kinds of pleats using math. I share formulas that you can use to create any size pleat you want.

Welcome to Sewing With Numbers, a newsletter about sewing, math, design and how to draft your own sewing patterns. Through simple pattern drafting exercises, I’ll show you how fun, useful and empowering math can be. ✂️ Posts older than 3 months are archived for paid subscribers. But if subscriptions aren’t your thing, I also have PDF Booklets for older projects in my shop.
Hello my mathy friends! Today, we are going to play with pleats. A pleat is simply a fold in the fabric. If you’ve ever folded a piece of paper, you can fold a pleat.
Pleats are very versatile and can be found in all types of garments including skirts, pants, shirts and jackets. They can be topstitched or loose, straight or shaped. They can be very narrow or very wide. The entire fabric can be pleated, or just one section.
I consider pleats to be a close relative to gathers. Pleats are just a bit sleeker and more streamlined. Like gathers, pleats can be used to make a piece of fabric smaller so that it can be sewn to another piece of fabric. But, pleats can be sewn a lot of different ways so they’re more versatile than gathers.
In this post, I’ll show you how to draft straight pleats in three different configurations. We’ll be using mathematical formulas so that you can draft pleats to fit any project you’re working on. Let’s get started!
RELATED READING


Types of Pleats
There are two main types of pleats: Knife (aka Side) Pleats and Box Pleats. The Knife/Side Pleats are folded to one side. Knife pleats are often found in skirts and pants.
The Box Pleat is folded in half, with one half pressed to the left and one half pressed to the right. When the bulk of the pleat is positioned on the outside of the garment, it’s called an Inverted Box Pleat. You’ll often find this style of pleat on the back of a shirt or jacket.
Notes for drafting pleats
To streamline these exercises, we’ll be using the same letters throughout the formulas. When drafting your own pleats, you can enter the dimensions of your choosing.
IMPORTANT NOTE: For the following examples, it may help to imagine that you are drafting a skirt with a waistband. The finished width of the waistband is “A”. The width of the skirt pattern piece is “B” wide before pleating, and after pleating it will be “A” wide.
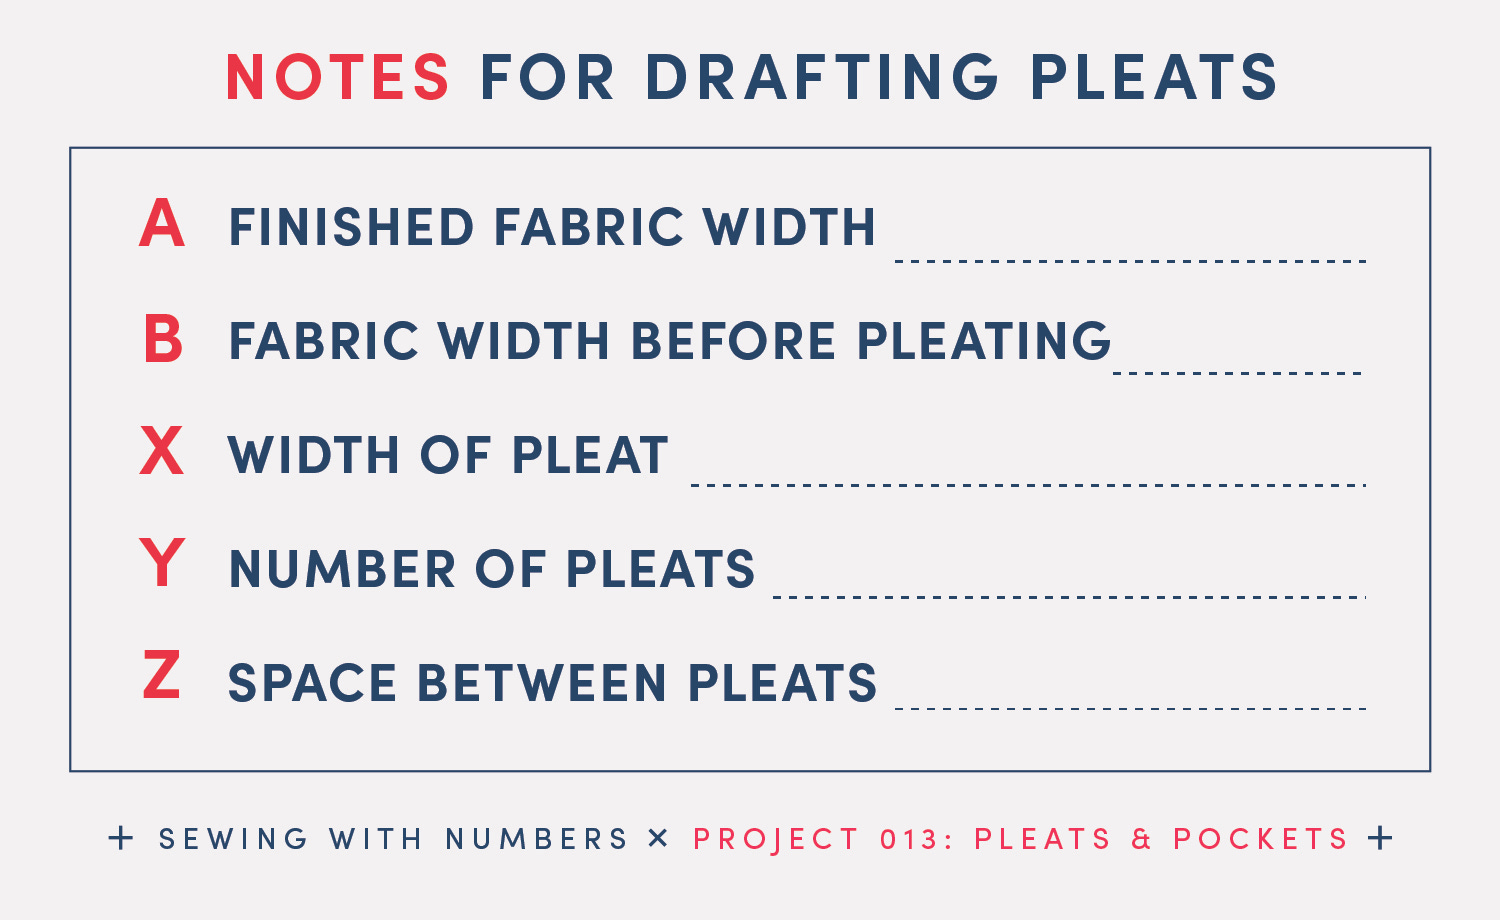
A Finished Fabric Width This is the smaller piece of fabric that the pleated fabric needs to fit to. For example, a waistband pattern piece.
B Fabric Width Before Pleating For these tutorials, we are looking to find "B”. This is how wide the fabric needs to be to create the style of pleats that we want. For example, this is the width of the skirt pattern piece before pleating.
X Width of Pleat This is the width of the pleat AFTER folding.
Y Number of Pleats This is the number of pleats you want to make in the fabric.
Z Width of Space Between Pleats When making spaced pleats, you’ll want to know how much space to leave between each pleat. In Example 1, this number is zero and we don’t need to use it. In Example 3 however, we will space each pleat equally by a width of “Z”.
Example 1: How to Draft Edge to Edge Pleats
Drafting this style of pleat is satisfyingly easy. That said, I always find it helpful to make a drawing of my pleats to help visualize the design. For these pleats, each pleat is folded and pressed to one side without any space in between each pleat. In the drawing below, you can see that each pleat is comprised of 3 equal layers of fabric.
Each finished pleat is “X” wide when folded and is 3 times “X” when unfolded.
In the example above, the waistband has a Finished Width of “A”. The skirt pattern piece needs to be three times as wide as A to make edge to edge pleats. In other words, the Fabric Width Before Pleating B equals three times Finished Fabric Width A. Or in shorter terms, B = 3 × A.
You can use any number for the Width of the Pleat X. An easy way to determine an even number of pleats is to select the Number of Pleats Y. Then divide the Finished Fabric Width A by Y to find X. In shorter terms, X=A/Y.
For example, if A=30 and you want to make 10 pleats, then the width of each pleat X = A/Y = 30/10 = 3. Or, if you want 15 pleats, then the pleat width X= A/Y = 30/15 =2.
Example 2: How to Draft a Box Pleat
For this example, we’ll draft a skirt (or other garment of choice) with spaced box pleats. Again, I find it help to look at a drawing of the pleats to visualize how much fabric is needed for each pleat. To draft these box pleats, we’ll start with the desired finished width “A” and then add in the extra fabric needed for the pleats. In the drawing below you can see the finished waistband is “A” wide and when the skirt is folded with three box pleats its width is also “A”.
For this example, we need to select the Finished Width A, the Pleat Width X, and the Number of Pleats Y. Again, we’re looking to find the Fabric Width Before Pleating “B”. In this example, we’re calculating how much fabric needs to be added to the finished width.
When a box pleat is folded, half of it goes to the left of the seam and half goes to the right. If the pleat is X wide when pressed flat, then the total width of fabric when unfolded is 2 times X. (Note the 2X fabric is the fabric underneath, and does not include the top layer.)
A little more info on why we use 2X: In the diagram above, the blue bottom layer of the pleat is X wide and the two pink middle layers are each X/2 wide. When added together, the total pleat fabric is X+X/2+X/2=X+X=2X. All that is to say that for each pleat we need to add 2X to the fabric width.
To calculate the Fabric Width Before Pleating B, we can add together the Finished Width A, plus the fabric needed for the pleats times the number of pleats Y. So, the B equals A plus two times X times Y. Or in math terms:
B = A + (2 × X × Y)
For example, if we want to add 2 box pleats that are 4” wide to a skirt with finished waistband of A=20”, then B = A + (2 × X × Y) = 20 + (2 × 4 × 2) = 20 + 16 = 36”.
Example 3: How to Draft Spaced Pleats
Sometimes, you’ll want the look of all over pleats but you don’t want the bulk of having them right next to each other (like the edge to edge pleats in example 1). Or, maybe you don’t have enough fabric for edge to edge pleats so you need to space them out a bit. This is the most challenging example to draft but not too hard if you take your time.
And, again I find it really helpful to make a drawing. Below I’ve drawn knife/side pleats that are “X” wide and are spaced “Z” apart. For this example, I’m placing a space at the beginning and end as well as in between each pleat. This means that there will be one more space than pleats, so the Number of Spaces equals (Y+1).
These pleats are all equal width “X” with equal spacing “Z”. When folded and sewn, each space plus pleat equals Z+X. If you count up the layers of fabric in each pleat, you’ll find that when unfolded, each space plus pleat equals Z+3X.
STEP 1:
Again, we are solving for B Fabric Width Before Pleating. You will need to know A Finished Fabric Width. You can select your desired X, Y, and Z but you need to make sure that they will equal “A” and not be too big. This can take some playing around.
I’d start by selecting your ideal X and Y. Then calculate X times Y. If XY is greater than A, you’ll need to decrease X and/or Y. Then, use the formula to solve for Z. Let’s look at the math.
We know that the Finished Width A equals the sum of the widths of all the pleats and spaces. In more detailed math terms, A equals Pleat Width X times Number of Pleats Y plus Space Width Z times the Number of Spaces (Y+1). In simpler terms:
A = (X×Y)+Z×(Y+1) We can use this to find Z.
Z = (A-XY)/(Y+1) Subtract XY from each side, then divide by (Y+1) to solve for Z.
For example, let’s say A=30, and we want X=2 and Y=10. We’ll start by calculating X times Y, 2×10 = 20. This is less than A so we know we’ll have enough room for spaces between the pleats. Now, we can calculate Z.
Z = (A-XY)/(Y+1) = (30-20)/11 =10/11 = .9
STEP 2:
Now that we have X, Y and Z figured out, we can calculate B Fabric Width Before Pleating.
To calculate the Fabric Width Before Pleating B, we can add together the the fabric needed for the pleats 3X times the number of pleats Y plus the number of spaces Y+1 times the width of the spaces Z. So, B equals (three times X times Y) plus (Y plus one) times Z. Or in math terms:
B = (3×X×Y) + (Y+1)×Z
I hope that you enjoyed this post. I think these pleats are really fun to draft and there are so many different ways to use them and so much opportunity for variation in design. Please let me know in the comments if you have any questions.
There are lots of ways to support this free content. You can tap the “heart” at the top or bottom, share or “restack” the post to help other people find it. Become a paid subscriber or, visit one of the links below.
Sewing With Numbers Drafting Manuals are now available for purchase.
Pattern Shop | Improv Quilting E-Course | Ko-Fi | YouTube
Happy mathing!
Beth

So inspiring to see how you think these problems through and discuss them so clearly!