


How to Draft a Skirt with Scooped Pockets
In this tutorial, I'm sharing how to adapt the basic woven skirt block into an A-Line Skirt with cut-away scooped front pockets

Welcome to Sewing With Numbers, a newsletter about sewing, math, design and how to draft your own sewing patterns. Through simple pattern drafting exercises, I'll show you how fun, useful and empowering math can be. ✂️ Posts older than 3 months are archived for paid subscribers. But if subscriptions aren’t your thing, I also have PDF Booklets for older projects in my shop.
Hello my mathy sewing friends! This week we are continuing Project 009-Woven Skirts with another fun variation of the woven skirt and a new drafting technique—cut away pockets! We’ll be using the skirt block that we drafted two weeks ago, adding some shaping and scooped pockets. The pockets are cut away from the front pattern piece and are both visible and functional on the garment. You can add this style of pocket to pants or skirts. It’s a great skill to learn!
If you need to catch up on the previous posts in this series, links are below.


There are three big changes in this week’s draft versus last week’s. First, we’re adding more volume to the skirt. Second, because of the add volume and Hem Sweep, we don’t need a kick pleat/vent at the center back. Third, the Skirt Front has a cut out for the pockets and there are two new pocket pattern pieces.
The waistband is drafted the same as last week so I won’t repeat it here. (I’m always running long on these emails!)
HOW TO DRAFT AN A-LINE SKIRT WITH SCOOPED POCKETS
Note, in the illustrations, I’m using the Basic skirt block. If you are working with an Advanced skirt block, yours will look a little different and you’ll have separate pattern pieces for the back and front.
Part 1: Collect Information
I’ve assigned a representative letter to each number we’ll need. I’ll use these letters to write the drafting formulas. When drafting your skirt, you’ll replace the letters with your own numbers. To reduce confusion, I’m reusing letters A through E from the last two weeks.
D Skirt Length This is the finished length from the bottom of the waistband. Last week, we were working with a knee length. For this draft, you may want to go shorter or longer.
E Hem Sweep Designer's choice! The hem sweep is the finished circumference of the hem. The block is drafted as a straight skirt. If you want more of an angle or a fuller skirt, then you might want to estimate the hem sweep. An easy way to do this is with your flexible measuring tape. Make a loop with the tape and put it around your legs and hold it where you want the hem to land and adjust until you find the length you like.
F Pocket Opening Width This is the width of the pocket opening at the waistline of the skirt. This is a designer’s choice measurement. Overall, you’ll want the opening big enough for your hand to easily slide inside. But, you can also make the pockets bigger for design purposes.
G Pocket Opening Length This is the length of the pocket opening along the side seam. Just like the width, it’s designer’s choice.
H Seam Allowance Designer’s Choice!
I Hem Allowance Designer’s Choice!
Part 2: Prepare The Skirt Block
To start, we need to adjust the length and shape of the skirt block. If you have separate pattern pieces for the front and back, repeat for each.
One note, if your back and front pattern pieces are very different in width, I would consider dividing the Hem Sweep E proportionally between the front and back—instead of dividing it equally.
STEP 1: Shorten skirt block to desired length. (You can also make a longer skirt, just make sure to have enough hem sweep to walk easily. Or add a vent.)
STEP 2: Add shaping to the block to achieve desired Hem Sweep E. Because the pattern is covering one-fourth of the body, we need to divide the total Hem Sweep by 4.
METHOD 1 If you want to keep the dart, make even cuts, avoiding the dart area. Slash from the hem to the waist and rotate/spread the different sections until the length of the hem equals one fourth of Hem Sweep E or E/4.
METHOD 2 Alternately, you can remove the dart during the slash and spread process. Mark the locations of the slash lines and divide the dart uptake evenly between them. (If you have a small dart, dividing it up may not be necessary.)
Cut along the lines to the waist. Rotate each section until the dart uptake is closed at the waist.
Note, in the drawing, the upper sections of the slash lines are meeting. If you want more Hem Sweep, they can be opened more, like in Method One.
Finally, redraw the hem to be a smooth curve, connecting the separated panels.
Part 3: Draft the Skirt Back
The skirt back has a seam at the center back and a center back zipper.
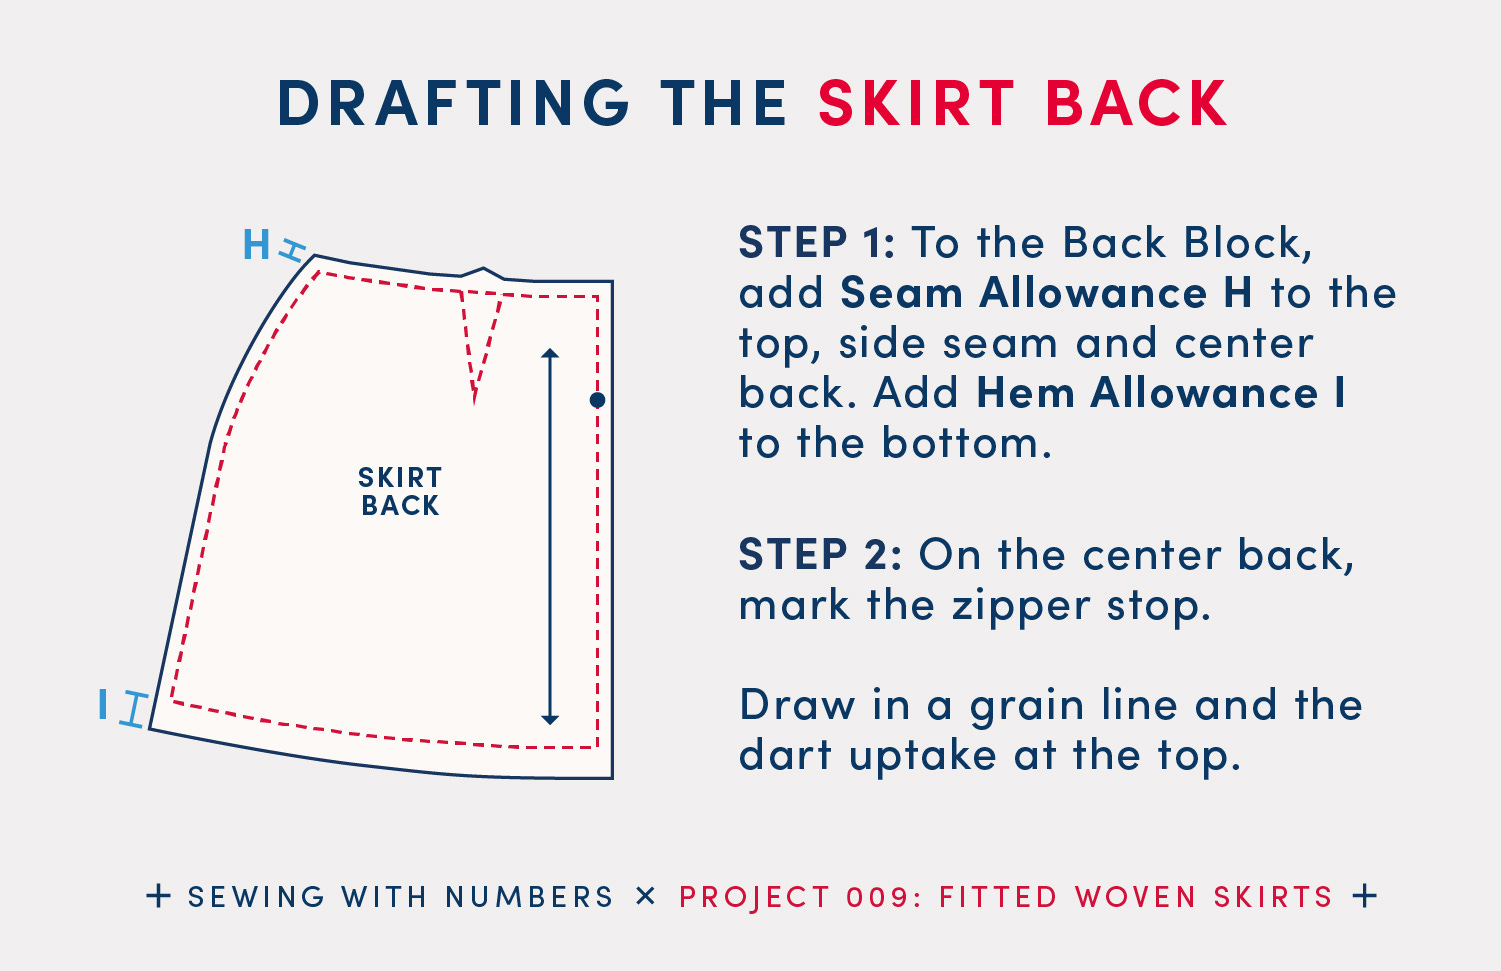
STEP 1: To the Back Block, add Seam Allowance H to the top, side seam and center back. Add Hem Allowance I to the bottom.
STEP 2: On the center back, mark the zipper stop. Draw in a grain line and the dart uptake at the top.
Part 3: Draft the Skirt Front
Now for the fun part of today’s tutorial—the pockets!
STEP 1: To the Front Block, mark the Pocket Opening Width F and the Pocket Opening Length G on the top and side seam edges.
STEP 2: Draw a line connecting F and G to create the pocket opening. (Shown in red in upper left of graphic above.) This line can be curved or straight.
STEP 3: Draw a line for the bottom edge of pocket bag. (Shown in red in lower right of graphic above.) This line should start a little ways to the right of the pocket opening (I’d want at least one inch, but likely more). Then the line ends on the side seam, below the pocket opening drawn in Step 2.
This line determines how deep the pocket is on the inside and is not visible on the right side of the garment. I generally like my pockets to be at least as deep as my hand.
To create the Pocket Bag pattern piece, trace the upper left corner of the Skirt Front pattern and this (red) line.
STEP 4: To create the Pocket Lining pattern piece trace the two curved lines, and the side seam and waist edge that connect to the curved lines.
STEP 5: Now we’re ready to put the finishing touches on the Skirt Front pattern piece. On the Skirt Front, cut along the pocket opening line.
Add Seam Allowance H to the top, pocket opening and side seam. Add Hem Allowance I to the bottom.
Draw a fold line at the center front. Draw in the dart uptake at the top.
STEP 6: Add Seam Allowance H to all edges of the Pocket Bag and Pocket Lining. Draw in the grain lines.
Details of the Scooped Pockets
If you haven’t sewn this style of pocket before you might be wondering how it all goes together. You start by sewing the Pocket Lining to the Skirt Front and turning it to the wrong side. Then the bottom edge of the Pocket Bag is sewn to the bottom edge of the Pocket Lining. And finally the side seams and waistline are aligned and basted together.
My Lou Box Dress 2 pattern uses this style of pocket and I have a photo tutorial on my other blog of the construction.
In the graphic above, you can see how the pattern pieces are layered together when sewn. The Pocket Bag is on the bottom with the top left corner cut out visible. The Pocket Lining is second and hidden by the Skirt Front. Finally, the Skirt Front is on top.
In the graphic above, the left side shows the order of pattern pieces going from bottom to top. On the right side, the pattern pieces are layered as if sewn. The Skirt Front is slightly transparent to show where the edges of the pocket pieces.
For easier sewing, I recommend adding notches on the waist seam and side seam where all the pattern pieces meet. See the red dots in the illustration above. When drafting, it’s easiest to add these notches, before separating the pattern pieces.
I hope that you enjoyed this tutorial! It’s been fun to think about these variations to the basic skirt block. Please let me know in the comments if you have any questions. Next week, I’ll show you how to adapt the skirt block into a wrap skirt.
There are lots of ways to support this free content:
Tap the "heart" at the top or bottom
Share or “restack” the post to help other people find it.
Become a paid subscriber
Visit one of the links below.
Sewing With Numbers Drafting Manuals are now available for purchase.
Pattern Shop | Improv Quilting E-Course | Donate at Ko-Fi | YouTube
Happy mathing!
Beth