How to clean up seam allowances
A little bonus post on how to adjust the corners of seam allowances on a curved edge that will makes things easier to sew.
Welcome to Sewing With Numbers, a newsletter about sewing, math, design and how to draft your own sewing patterns. Through simple pattern drafting exercises, I'll show you how fun, useful and empowering math can be. ✂️ Posts older than 3 months are archived for paid subscribers. But if subscriptions aren’t your thing, I also have PDF Booklets for older projects in my shop.
Hello sew-friends! Today is a bonus post related to our most recent Undies project. As I was sewing the undies for last week's post, I was thinking about how seam allowances along curves can be drafted for easier assembly. Basically, the corners of the seam allowance can be trimmed so that the cut edges of fabric line up perfectly for sewing a seam. I'm honestly not sure what the correct terminology is for this concept. It seems similar to "Trueing" but trueing is generally about the seam line, not the seam allowance. If you know, please let me know in the comments.
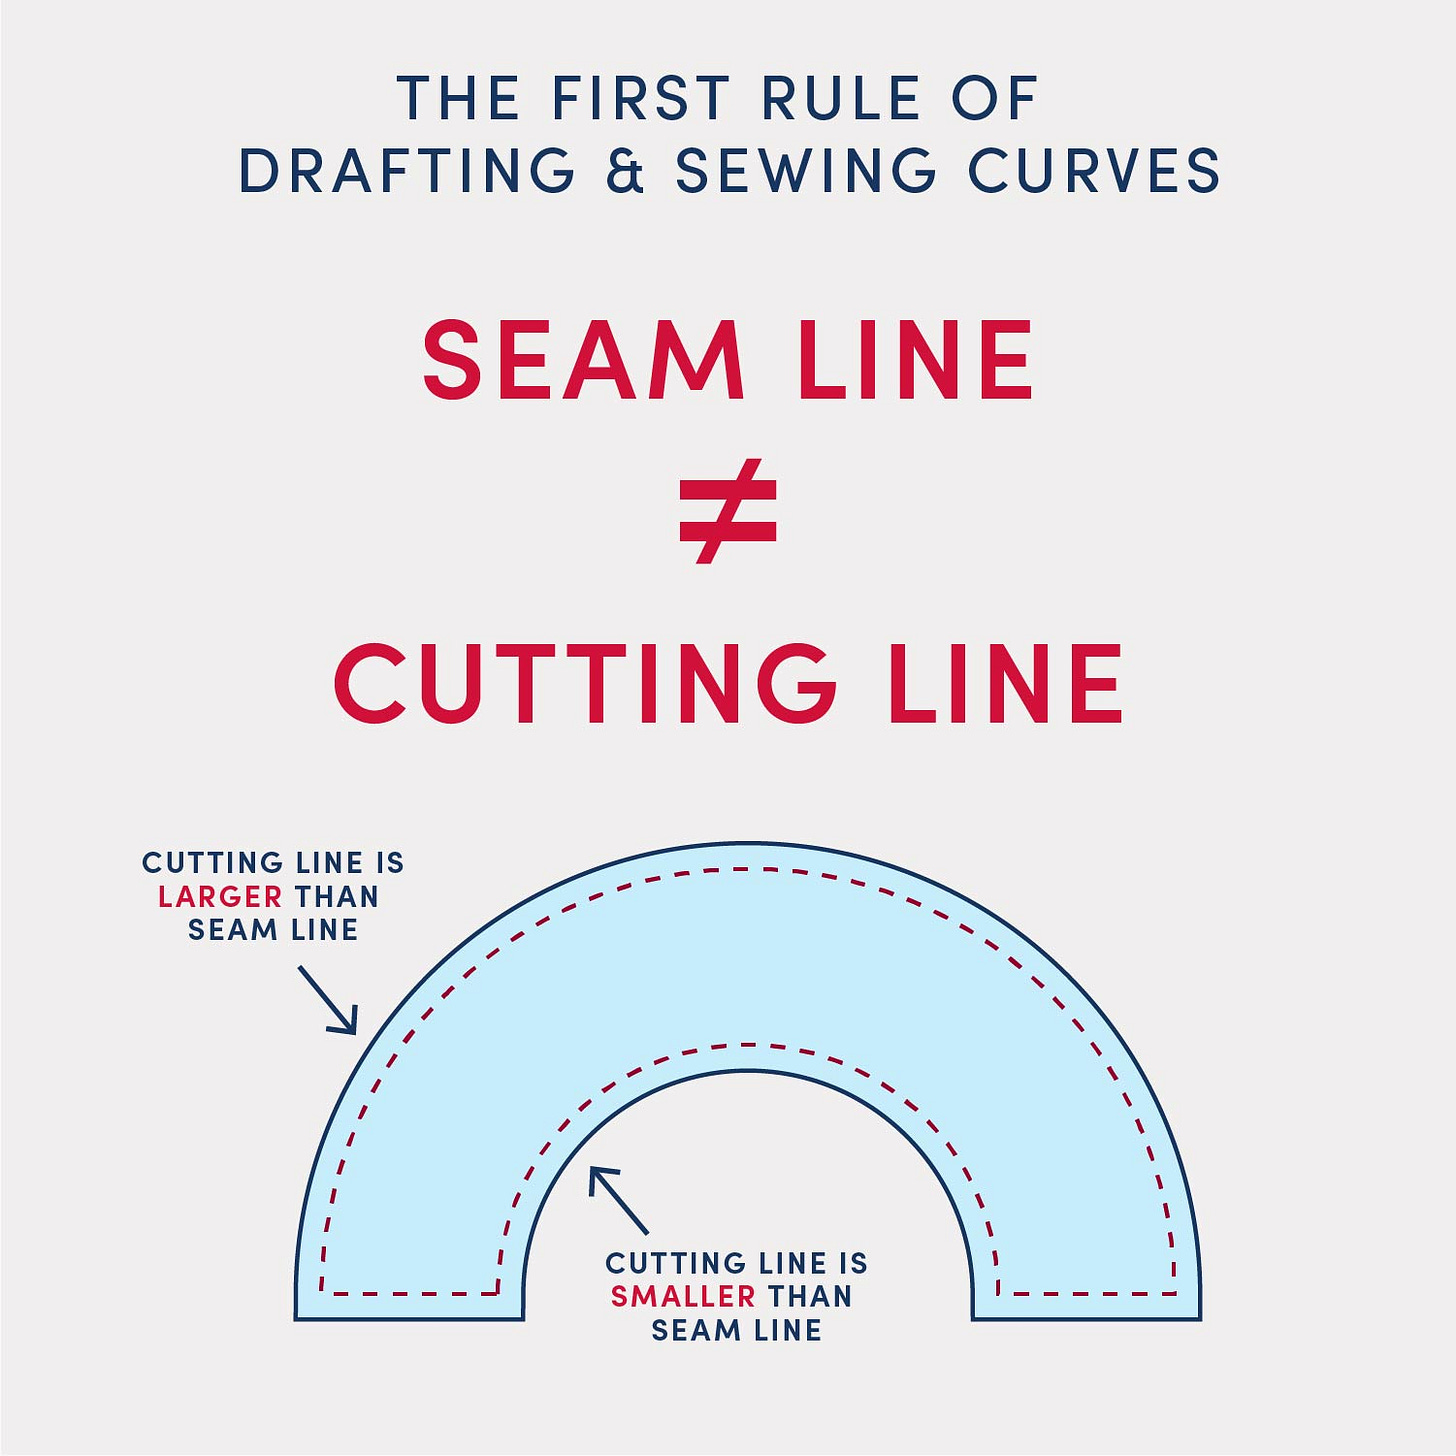
So, in lieu of verified terminology, I'm going to call this process "Cleaning up" the seam allowances. Cleaning up is most commonly needed in items with curved seams, like in undies, shoulders or even a curved hem. The issue is that when we are drafting curves, the seam line and the cutting line are not equal. I wrote about this for Project 002—Sun Hats.
Why would you want to "clean up" the seam allowance?
When the corners of the seam allowance are cleaned up, the pattern pieces will align so that the seam lines AND the cut edges are aligned. This way the sewer/sewist doesn't have to think about where the seam line is when they line up the fabric for stitching.
It's kind of an invisible thing that a pattern drafter can do to make construction easier. When I'm drafting and sewing something for myself, I don't bother with cleaning up. But, if I'm making a pattern for sale, I do take the time. I think it's especially helpful for beginner sewists. (People can also use notches to properly line up the seam line but I like to avoid confusion as much as possible.)
If the seam is going to be pressed in one direction (as opposed to pressed open), then "Cleaning up" the seam allowance can also make the insides cleaner and reduce the need for trimming away excess fabric.
Let’s look at some examples
You don’t need to clean up the seam allowance corners for every pattern, just occasionally. It’s usually something I’ll notice when I’m test sewing and then I’ll go back and adjust the pattern. Below are a couple of examples from patterns I have in my shop.
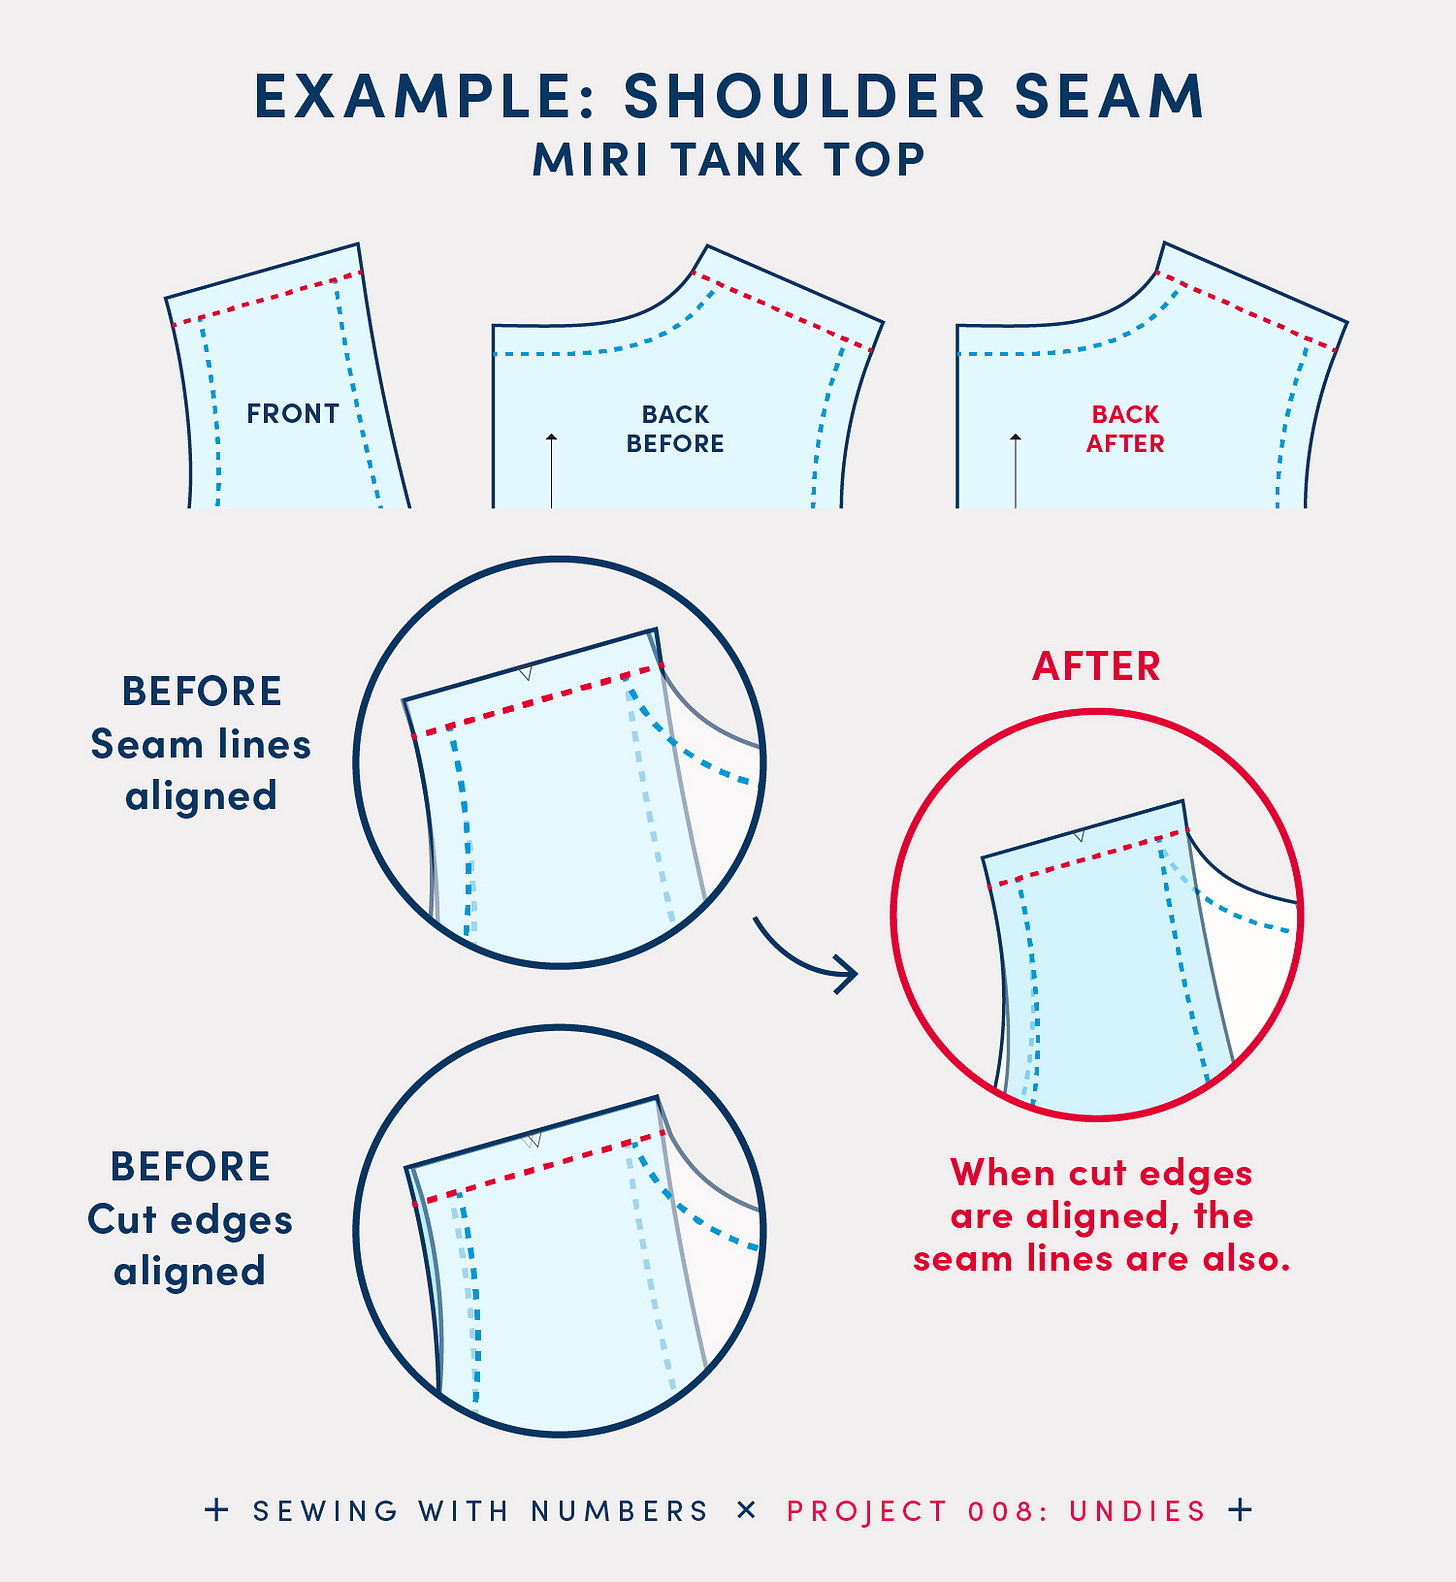
First, let’s look at the Miri Tank Top pattern. For this pattern, I adjusted the inner corner of the Back Shoulder seam allowance. In the graphic above, the images on the left show how the pattern pieces overlap at the shoulder before the cleaning up. With the seam lines aligned, the inner corners (top right of middle graphic) are not aligned. With the cut edges aligned at the inner edge, the seam line becomes misaligned and it appears there may be a drafting issue because the cut lines are not equal.
In the red circle on the right, you can see what the pattern pieces look like after “cleaning up”. The stitching line, notch and cut edges are all aligned. The sewist won’t need to question whether something was cut or drafted incorrectly.
For this pattern the shoulder seams are pressed open and the neckline and arm openings are finished with an all-in-one facing. There will be some seam allowance that needs to be trimmed but trimming needs to happen anyway when attaching the facing.
For this next example, let’s look at the hem facing of my Lou Box Dress 1 pattern. This dress is a cocoon style with a higher hem in the front than in the back. For a clean finish along the curved edge, I made hem facings. In the graphic above, you can see the hem facings before cleaning up and after. Before cleaning up, the lines of the seam allowance continue to straight points in the corners. After cleaning up, the corners are trimmed off.
In this example, I made an adjustment to both the front and back facings. Depending on the curves, you may only need to adjust one pattern piece, like for the tank top above.
How to Clean Up Seam Allowance Corners on the Undies pattern
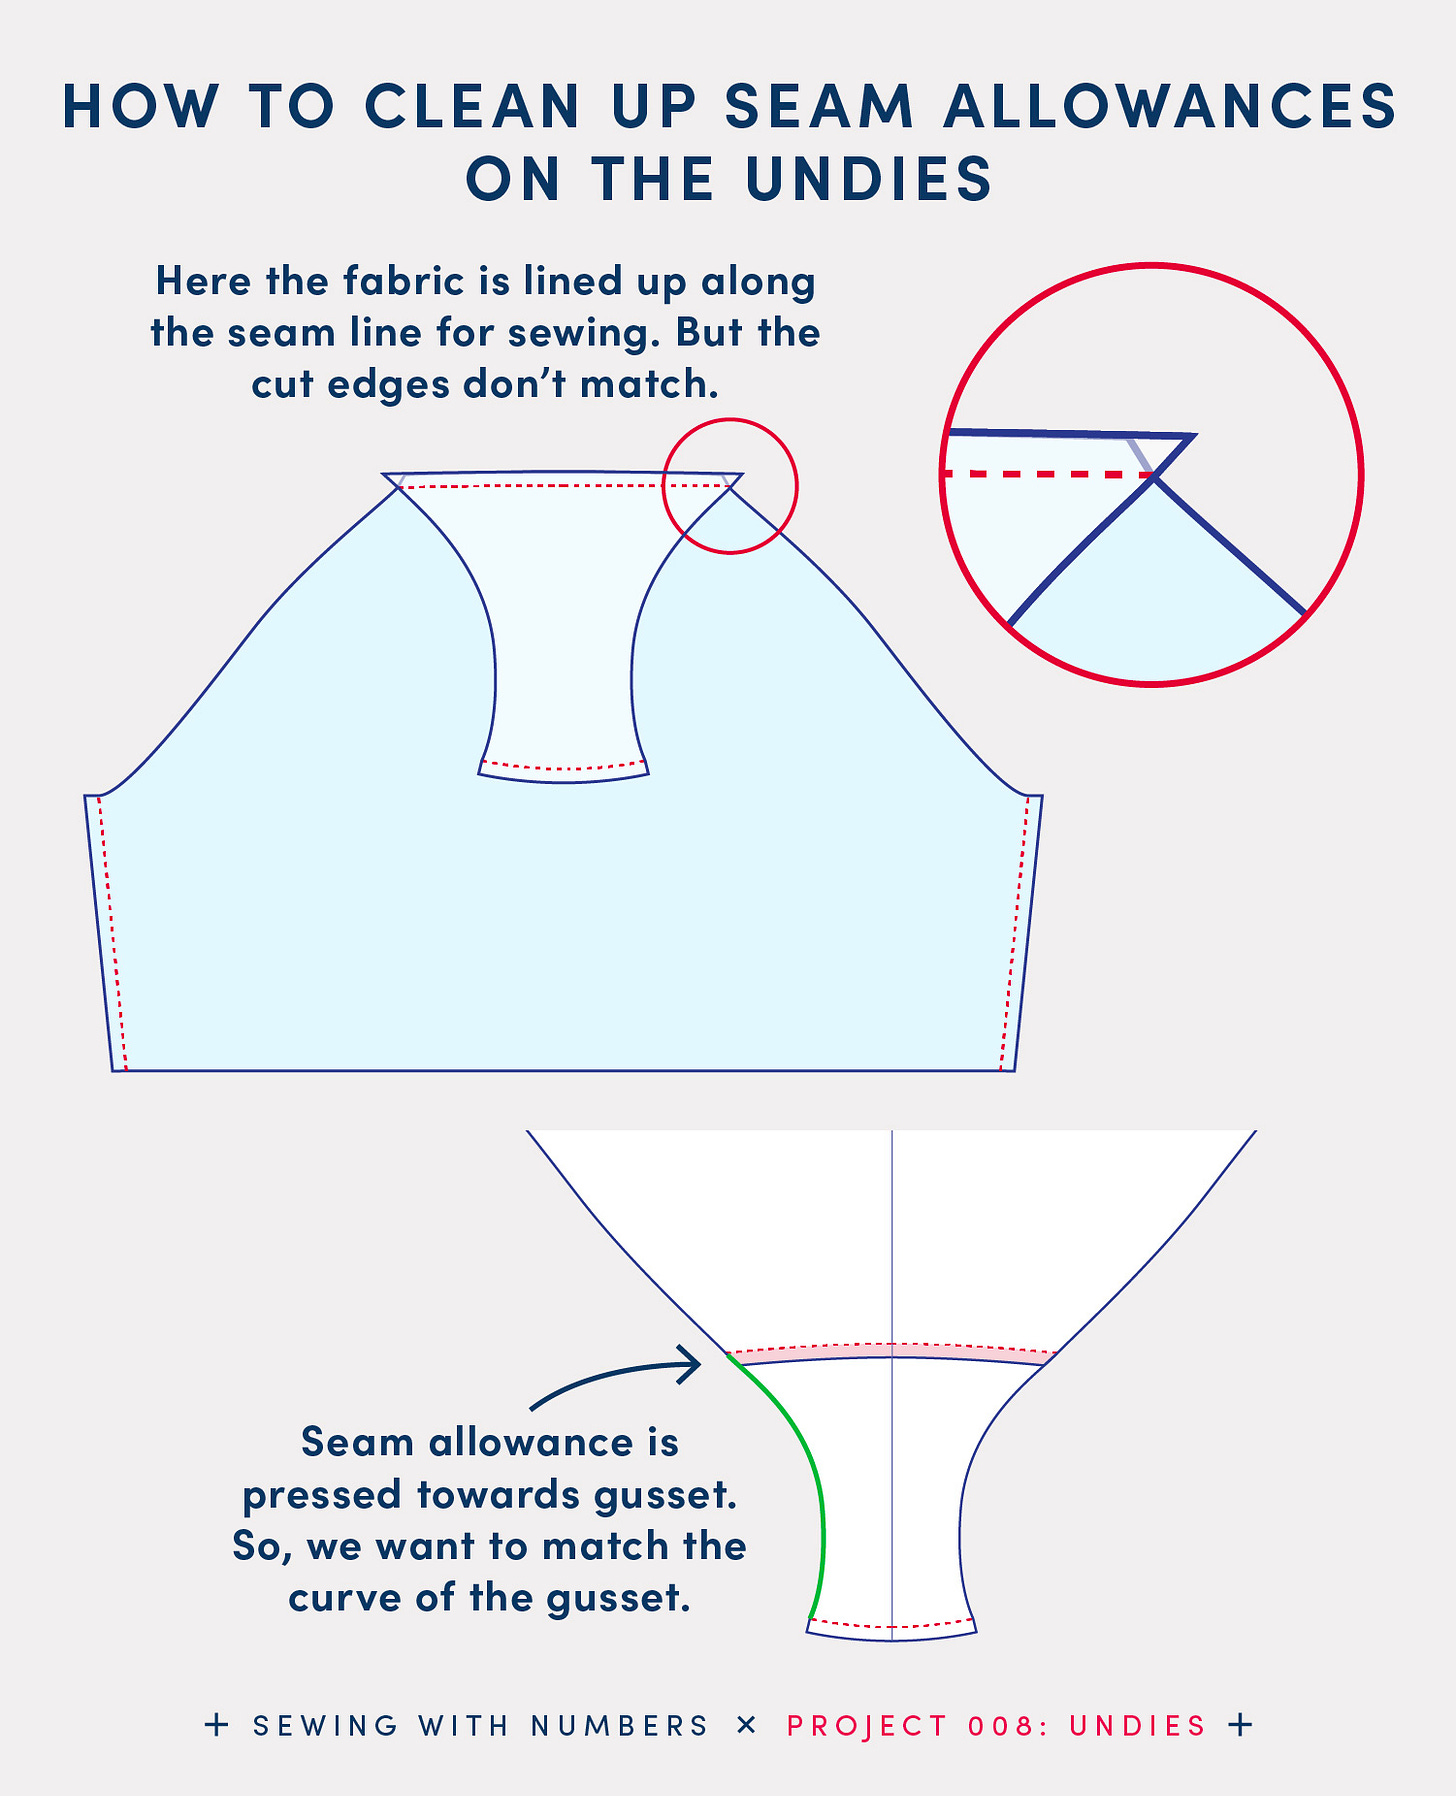
As I mentioned, it was while sewing the gusset of the undies last week that it occurred to me that I would have an easier time matching the fabric if I cleaned up the seam allowance. Due to the curve as the gusset transitions to the back and front, the corners of the seam allowance don’t automatically align.
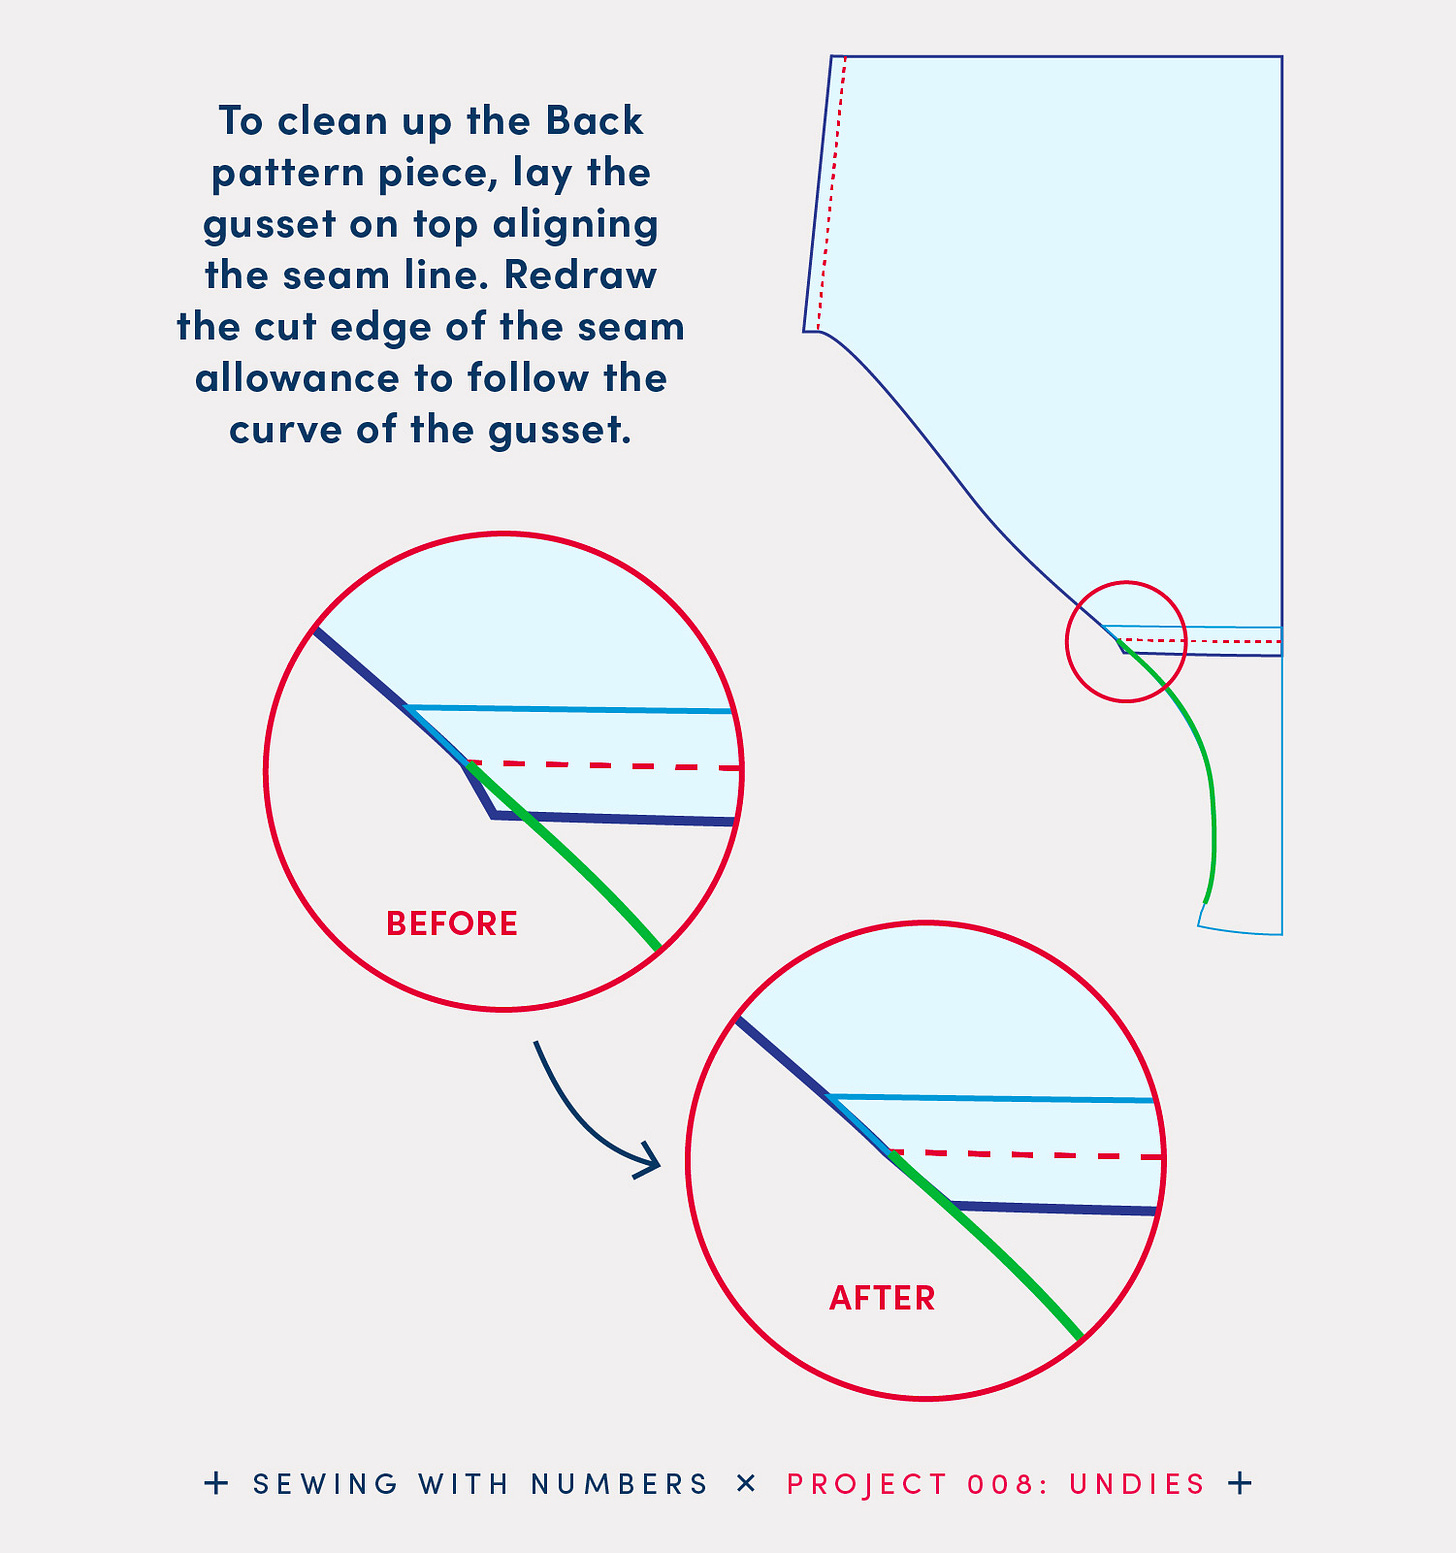
In the graphic above, you can see what the not cleaned up gusset and panty look like when layered. The corners of the gusset seam allowance extend past the edge of the panty.
For the construction of these panties, I serged the seam allowances together and pressed them towards the gusset. Because I’m pressing them together, I can clean up the seam allowance for better matching AND to reduce trimming. Thus, I want the seam allowances to match the curve of the gusset, shown with a green line in the graphic above.
[By the way, I have a video tutorial for how to sew these undies on my other blog. Click here to check it out.]
Because this pattern is extra curvy (like the hem facing), we’ll need to make adjustments to both pattern pieces. To clean up the Back pattern piece, lay the gusset on top aligning the seam line. Redraw the cut edge of the seam allowance to follow the curve of the gusset. In this case, we’ll cut away a small triangle from the seam allowance.
Cleaning up the Gusset pattern piece is a little bit trickier. We need to reflect the gusset vertically and align the seam line. Redraw the cut edge of the seam allowance to follow the curve of the gusset. Again, we’re removing a little triangle from the seam allowance.
If you are working with a paper pattern, you can fold the pattern along the seam line and trace the curve onto the seam allowance. Then cut along the curve.
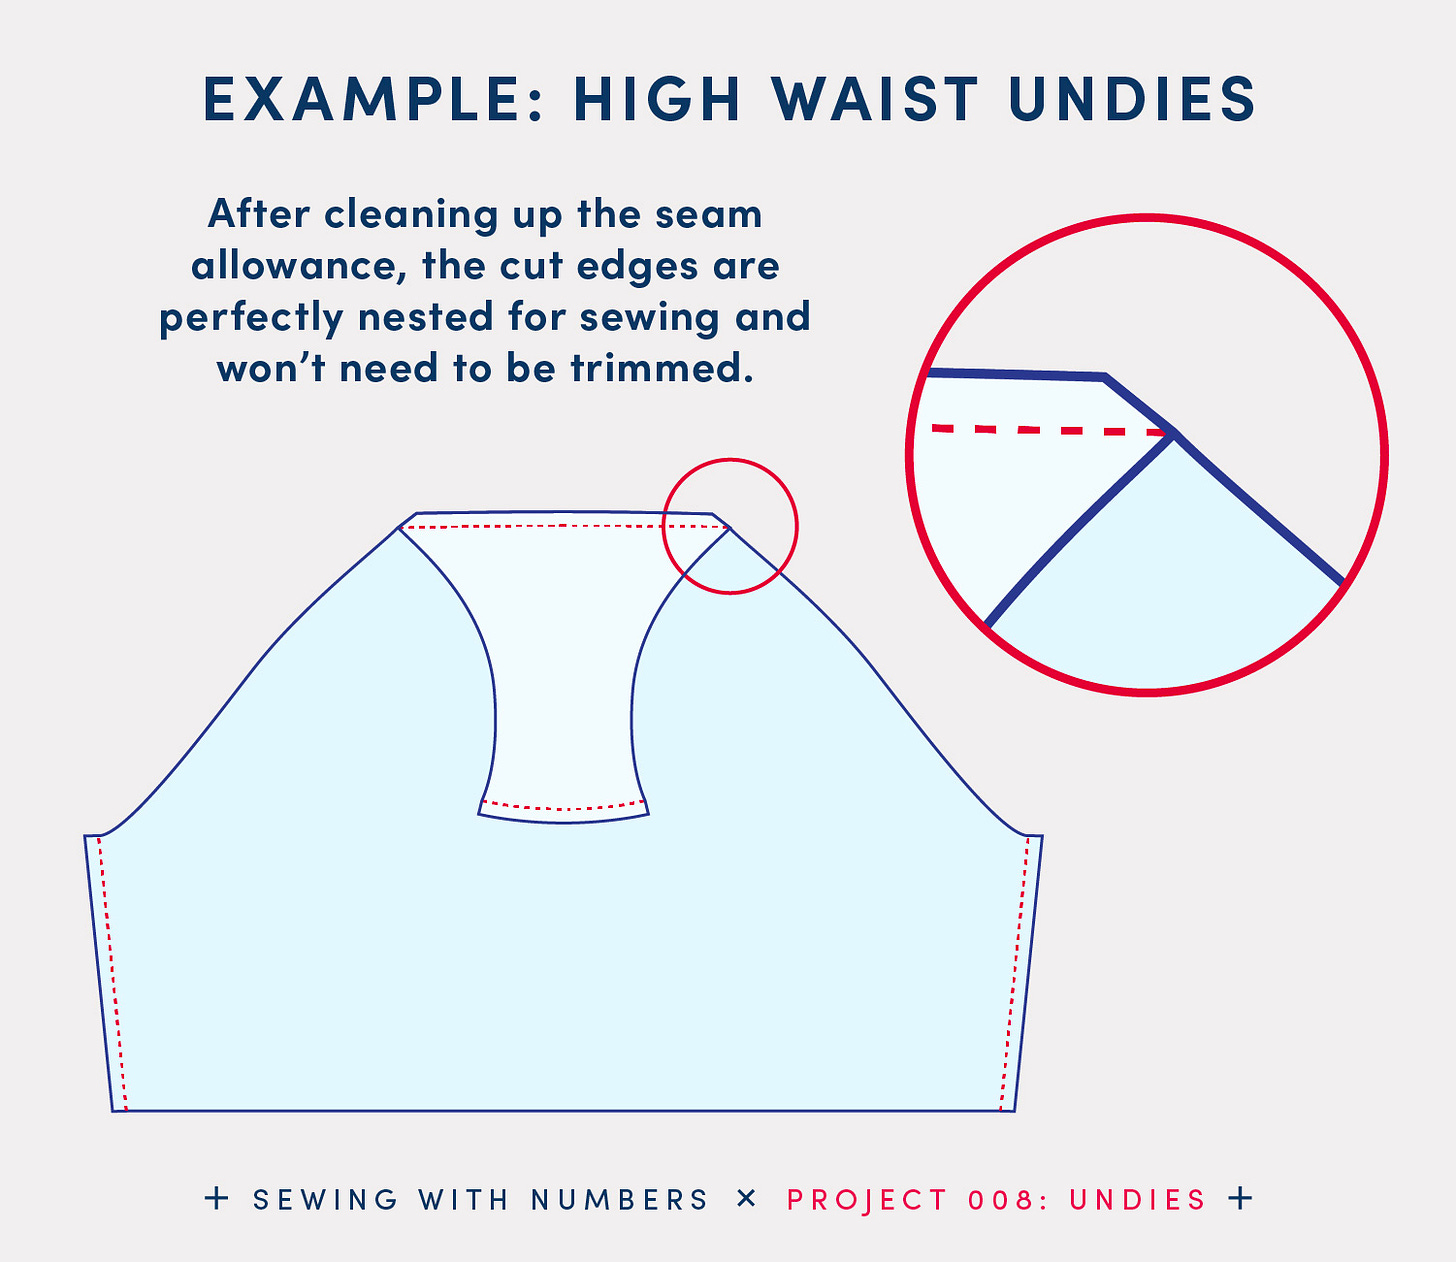
And that’s it! Here’s our cleaned up back and gusset. When the cut edges are lined up, the seam lines will also line up. And, when the seams are pressed toward the gusset, you won’t need to trim any corners.
One final tip, if you are making a multi-size pattern, I recommend cleaning up the seam allowances before grading. You can read a little more about my process in the post below.
I hope that you enjoyed this series. For our next project, I’m planning to do a woven skirt block. But, I may take a break from posting next week to get caught up on things, including the pdf manual of the Winter Hats project. Thank you so much for following along. Please let me know in the comments if you have any questions and if you find this type of post interesting.
There are lots of ways to support this free content. You can tap the "heart" at the top or bottom, share or “restack” the post to help other people find it. Become a paid subscriber or, visit one of the links below.
Sewing With Numbers Drafting Manuals are now available for purchase
Pattern Shop | Improv Quilting E-Course | Ko-Fi | YouTube
Happy mathing!
Beth


