


How to Draft a Wrap Skirt
This week, we're taking the woven skirt block and adapting it into a wrap skirt.

Welcome to Sewing With Numbers, a newsletter about sewing, math, design and how to draft your own sewing patterns. Through simple pattern drafting exercises, I'll show you how fun, useful and empowering math can be. ✂️ Posts older than 3 months are archived for paid subscribers. But if subscriptions aren’t your thing, I also have PDF Booklets for older projects in my shop.
Hello my mathy sewing friends! This week we are continuing Project 009-Woven Skirts with another variation of the woven skirt. We’ll be using the skirt block that we drafted three weeks ago and converting it into a wrap skirt. A wrap skirt is a really delightfully easy adaptation. One of my first patterns was actually a wrap skirt with an angled front. (Click here to check it out.)
If you need to catch up on the previous posts in this series, links are below.


This wrap skirt has a slight A-line, waist darts and medium length. It’s kept closed with a visible button at the opening and a hidden closure on the inside of the waistband. The opening edge of the wrap skirt is finished like the hem with a folded facing.
In the bottom part of the illustration above, the wrap skirt is unfolded to show the wrong side. The blue parts indicate the right side of the fabric and the white is the wrong side.
HOW TO DRAFT A WOVEN WRAP SKIRT
Note in the illustrations, I’m using the Basic skirt block. Yours may look different.
Part 1: Collect Information
I’ve assigned a representative letter to each number we’ll need. I’ll use these letters to write the drafting formulas. When drafting your skirt, you’ll replace the letters with your own numbers.
A Back Waist This is the total finished measurement of the back waistline from side seam to side seam. Remember to not include the darts when measuring the seam line. (See the Anatomy of a Wrap Skirt graphic above for visual reference.)
B Front Waist This is the total finished measurement of the front wrap waistline, from the side seam to the end of the wrap. To determine this number, first decide where you want the edge of the wrap front to sit. Then measure from that point to the opposite side seam. (See the Anatomy of a Wrap Skirt graphic above for visual reference.)
C Waistband Length This is the finished length (top to bottom) of the waistband. This is a straight waistband so something in the 1-2” range would be most comfortable.
D Facing Width This is the width of the grown-on facing at the opening of the skirt. Designer’s Choice! I would probably make this the same as the hem allowance but you can decide how wide you want the facing at the opening to be.
E Seam Allowance Designer’s Choice!
F Hem Allowance Designer’s Choice!
Part 2: Draft the Waistband Pieces
Drafting the waistband is very similar to the one we did in the Pencil Skirt tutorial. For this tutorial, I’m drafting separate front and back waistband pattern pieces. I like separate pieces for a couple of reasons. One, it’s easier to make fit adjustments when you have extra seam allowance at the side seams. Two, with a wrap skirt, you can sew ties or other hardware into the side seam for a different style of closure.
How to Draft the Back Waistband Pattern Piece
STEP 1: Draw a rectangle with width A Back Waist plus two times E Seam Allowance and length 2 times C Waistband Length plus two times E Seam Allowance. In short, the width is A+2×E and the length is 2×C+2×E.
STEP 2: Draw in a horizontal Fold Line and grain line.
How to Draft the Front Waistband Pattern Piece
STEP 1: Draw a rectangle with width B Front Waist plus two times E Seam Allowance and length 2 times C Waistband Length plus two times E Seam Allowance. In short, the width is B+2×E and the length is 2×C+2×E.
STEP 2: Draw in a horizontal Fold Line and grain line.
Part 3: Prep the Skirt Block
First, adjust the length and shape of the skirt block. I showed how to do this in last week’s post and don’t want to repeat it again here. Click here and go to Part 2 for that part of the tutorial.
Part 4: Draft the Wrap Skirt Back
The skirt back has a fold at the center back. Pretty simple!
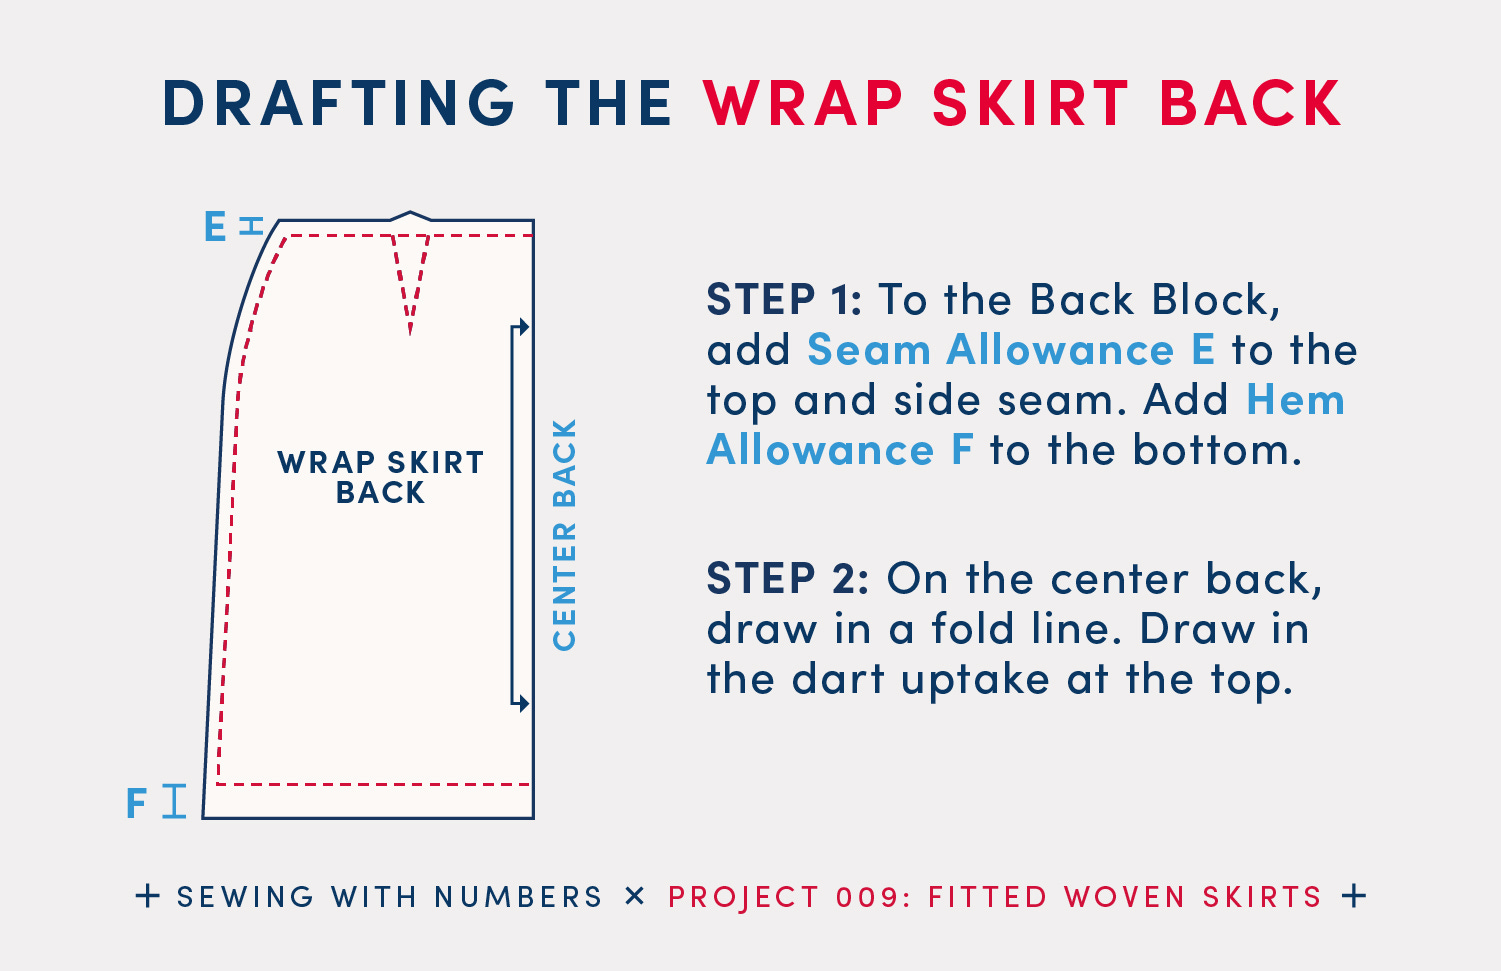
STEP 1: To the Back Block, add Seam Allowance E to the top and side seam. Add Hem Allowance F to the bottom.
STEP 2: On the center back, draw in a fold line. Draw in the dart uptake at the top.
Part 5: Draft the Wrap Skirt Front
Now for my favorite part of today’s tutorial—the wrap front! I’m drafting this with the same pattern piece for the left and right side and a straight opening. You might find you want a different overlap or a different shape.
STEP 1: Reflect the Front Block across Center Front line and trace.
STEP 2: Mark place on waistline where top wrap ends. This is Front Waist B from the side seam. Remember not to include darts in the waistline measurement.
Tip: You may find it easier to measure from the right side seam the amount of opening you’d like.
STEP 3: Draw a straight line from this dot to the hem. Cut along this line.
STEP 4: Add Seam Allowance E to the top and side seam. Add Hem Allowance F to the bottom.
STEP 5: Extend Facing Width D at opening edge. (Note, if the opening is angled, you’ll need to angle the top and bottom of the facing as well. See this post on cleaning up seam allowances.)
STEP 6: Draw in a grain line and the dart uptake at the top.
One final note, if you want to draft a mitered corner hem check out this post:

I hope that you enjoyed this tutorial! Please let me know in the comments if you have any questions. Next week, I’m planning to share some more quick variations of the woven skirt block.
There are lots of ways to support this free content:
Tap the "heart" at the top or bottom
Share or “restack” the post to help other people find it.
Become a paid subscriber
Visit one of the links below.
Sewing With Numbers Drafting Manuals are now available for purchase.
Pattern Shop | Improv Quilting E-Course | Donate at Ko-Fi | YouTube
Happy mathing!
Beth