

How to Draft High Cut Briefs
In this tutorial, I'll show you how to draft a pair of high cut undies for your custom measurements. Downloadable pdf worksheet included!

Welcome to Sewing With Numbers, a newsletter about sewing, math, design and how to draft your own sewing patterns. Through simple pattern drafting exercises, I'll show you how fun, useful and empowering math can be. ✂️ Posts older than 3 months are archived for paid subscribers. But if subscriptions aren’t your thing, I also have PDF Booklets for older projects in my shop.
Hello my mathy friends! I hope that you are doing well. Today, I’m sharing the second tutorial in our Undies Series (aka Project 008). This tutorial is for a high cut style of undies. This style has side seams that angle in towards the waist. As always, you get to choose all the details such as where the top edge sits and how long the side seam is. This pattern is designed to be sewn with stretch fabric and have the edges finished with elastic. Let’s get started!
References
For this tutorial, I referenced the book Pattern Cutting for Lingerie, Beachwear and Leisurewear by Ann Haggar (on Bookshop). The draft is similar to last week’s Bikini Brief tutorial, except with shaping at the side seam. If you missed either of the previous posts, they are linked below.


I wrote about using stretch fabric and negative ease in detail in Project 005, the Fitted Knit Skirt (see links below). (These posts are now behind the pay wall. You can subscribe to access them or buy the pdf version in my shop.)


To draft this pattern, we’ll be using a “Negative Ease Multiplier” which decreases the pattern by a percentage to correspond with how much stretch the fabric has. For reference, the chart is reposted below.
In this tutorial, I will also reference “Trueing” corners which I discussed in Project 002 Sunhats. In short, you need to "square off" the corners anywhere that two seams join, and the corner needs to be at a 90 degree angle.

How to Draft the Bikini Brief Pattern
Part 1: Collect Information
I’ve assigned a representative letter to each number we’ll need. I’ll use these letters to write the drafting formulas. When drafting your undies, you’ll replace the letters with your own numbers.
A Waist* Circumference This is the measurement of the body circumference where you want the top of the undies to sit. This may or may not be at the natural waist point (hence the asterisk in the text). See graphic below.
B Hip Circumference This is the measurement of the body circumference at the widest part of the hips. See graphic below.
C Side Seam Length Designer’s choice. To estimate this, you can tie pieces of elastic around your body at the top of the undies and then where you want the top of the keg opening to sit. Then use those guides to measure the distance in between along your side body. See graphic below. (For the Bikini Block we did last week, the reference text uses 9cm.)
D Front Crotch This is the curved measurement of the center front. Start measuring at the top of the front of the undies and end in the center of the crotch. See graphic below.
E Back Crotch This is the curved measurement of the center back. Start measuring at the top of the back of the undies and end in the center of the crotch. See graphic below.
Depending on your shape, D and E will likely be different. For the bikini draft, our reference text makes the Back Crotch 2cm longer than the Front Crotch.
F Negative Ease Multiplier Designer’s choice. See reference graphic and links above. This makes the pattern/fabric SMALLER than the body measurement and is intended for stretch fabric. (If you are not using stretch fabric, you can ADD ease to the pattern and fit the undies with elastic. This will give a baggier appearance to the undies.)
The gusset is the section of fabric that goes between the legs and connects the front and back.
G Gusset Width Designer’s choice. This is the side to side measurement of the gusset. You can measure a pair of undies that you like. Or pick a new one to try. The reference text recommends 7 cm total.
H Gusset Length Designer’s choice This is the total length of the gusset. You can measure a pair of undies that you like. Or, measure your body and estimate a different length. The reference text uses a total of 15cm Gusset Length with 6cm in the front and 9cm in the back.
I Seam allowance Designer’s choice.
Part 2: Draft the Pattern
Like with the Bikini Briefs, we’re going to draft this pattern as one piece and then divide it for the Front, Back and Gusset. We’ll start with a rectangle and then draw in the lines and curves to make the pattern. However, for this version, we’re switching the orientation to have the Front section at the top of the rectangle, the gusset in the middle and the Back section upside down at the bottom. If it was hard for you to visualize how the pattern pieces came together last week, this layout might make more sense.
Note, this rectangle is HALF of the pattern. If you were going to “put on” these undies, this is the left side of the pattern. The right side of the rectangle is the center fold line.
STEP 1: Draw a rectangle that is one-fourth of B Hip Circumference times F Negative Ease Multiplier and D Front Crotch plus E Back Crotch long. In short, the rectangle is (B/4)×F wide and D+E long.
Draw a line down the center width of the rectangle for the Side Seam. Starting on the bottom right corner of the rectangle, mark the length C Front Crotch along the right (center front) side.
STEP 2: Mark D Front Crotch down from the top and draw a horizontal line across the pattern. The bottom section of the pattern is E Back Crotch long.
STEP 3: Mark the center front and center back of the pattern on the right side of the rectangle. Label the top of the pattern the Front pattern piece and the bottom the Back pattern piece.
STEP 4: Let’s draw in the waist on the top and bottom edges of the rectangle. Starting at the right corners, mark one-fourth of A Waist Circumference times F Negative Ease Multiplier along the top and bottom edges. In short, this length is (A/4)×F. The left edge of this line is the top of the side seam and is shown with a red dot in the graphic above.
STEP 5: Next, draw in the side seam. Here you’ll be drawing a line from the waist to the hip (the left side of the rectangle). Starting at the left side of the line you drew in step 4, draw a line that C Side Seam Length long and ends on the left side of the rectangle. Repeat for the Back (bottom) part of the pattern.
STEP 6: On the horizontal line that you drew in Step 2, mark half of G Gusset Width from the right side, or in short G/2.
STEP 7: At the end of the new line, draw a vertical line H Gusset Length long. You can center the Gusset over the center line or shift it to the front or back if preferred.
Note: The reference text uses a total of 15cm Gusset Length and divides it over the front and back with 6cm in the front and 9cm in the back. (I don’t have strong personal feelings on gusset placement. The only scenario in which I think it would be crucial is when making period panties. Or, if you’re making a swim bottom, you might want to place the gusset seam so it’s not visible in the front)
STEP 8: Draw lines connecting the bottom of the side seams to the gusset. These lines are shown in blue in the graphic above. These lines are just for reference.
STEP 9: Using the reference lines you drew in Step 8, draw in curves for the leg openings and gusset. True the corners. In the graphic, the curved lines are shown in red and the reference lines are in pink.
STEP 10: Using the gusset length as a guide, draw lines for the gusset in the center of pattern. If desired, add a curve to the top and bottom of the gusset. Cut through the lines for the gusset to create a separate Front, Back and Gusset pattern piece.
STEP 11: If desired, reflect the gusset pattern piece across the center, so that it’s no longer cut on the fold.
STEP 12: Add I Seam Allowance to the side seams and gusset seams (where the gusset is sewn to the front and back). Add grain lines. If desired, you can also reflect the Front and Back pattern pieces so that they can be cut flat, instead of on the fold.
Part 3: Download the worksheet
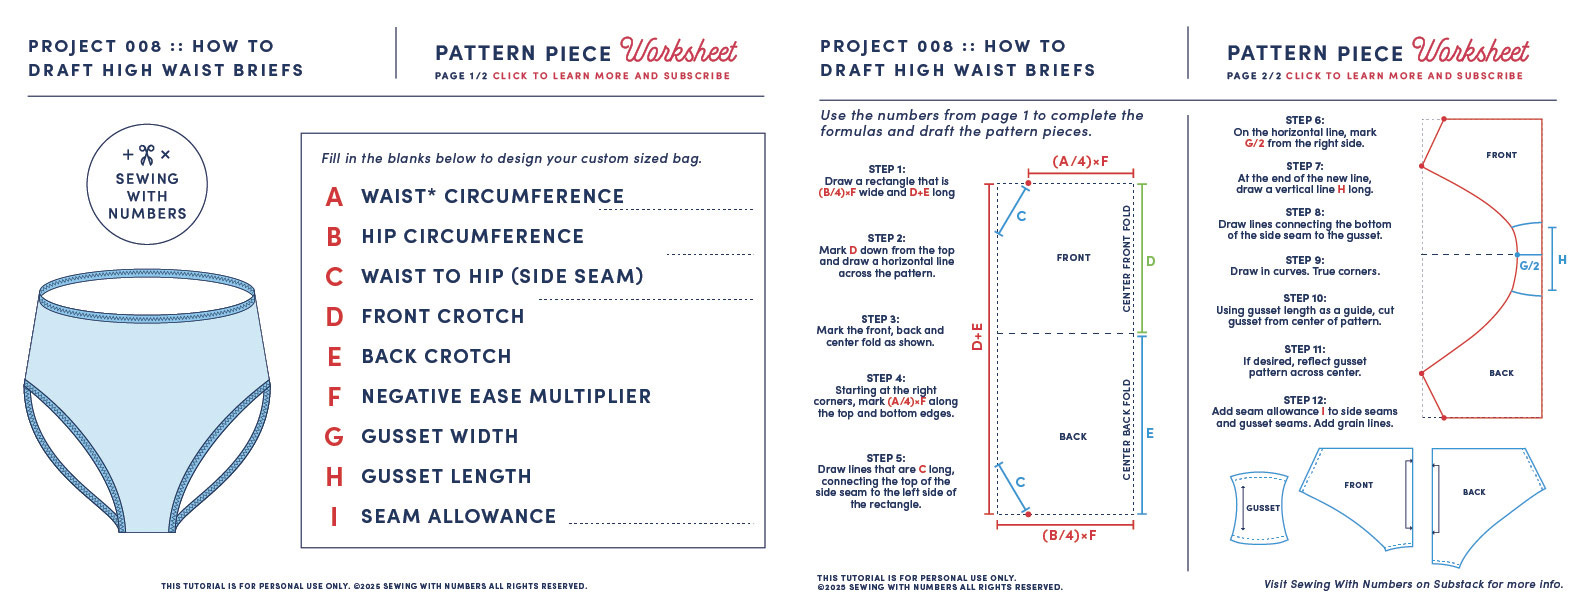
I always like having a place to write down my measurements. So, I made a two page recap of the instructions with just the notes and condensed diagrams. I hope you find it helpful!
I hope that you enjoyed this tutorial. Please let me know in the comments if you have any questions. As always, the first draft of a pattern is just a starting point. You’ll need to test and tweak to find the perfect fit for you.
There are lots of ways to support this free content. You can tap the "heart" at the top or bottom, share or “restack” the post to help other people find it. Become a paid subscriber or, visit one of the links below.
Sewing With Numbers Drafting Manuals are now available for purchase.
Pattern Shop | Improv Quilting E-Course | Donate at Ko-Fi | YouTube
Happy mathing!
Beth