Welcome to Sewing With Numbers, a newsletter about sewing, math, design and how to draft your own sewing patterns. Through simple pattern drafting exercises, I'll show you how fun, useful and empowering math can be. ✂️ Every 6 to 8 weeks, I feature a different drafting project, with each lesson building upon the learnings from previous ones.
Hello friends! I hope you're doing well. Today, I'm sharing my own version of the Funnel Neck Pullover. It's been a very busy October for me (i.e. lots of hours sitting at my desk!). But, it's been a beautiful fall in Seattle. After so many years living in Los Angeles, I really love seeing the leaves change color. But, it is rapidly getting colder and starting to feel like winter, so this heavy knit pullover has come just in time!
This post is the last in my series on How to Draft a Funnel Neck Pullover. In previous posts, I showed how to draft a tunic style block made to your size and then showed how to adjust that block to create a pullover with a snap placket. If you need a catch up, all the posts are on this page.
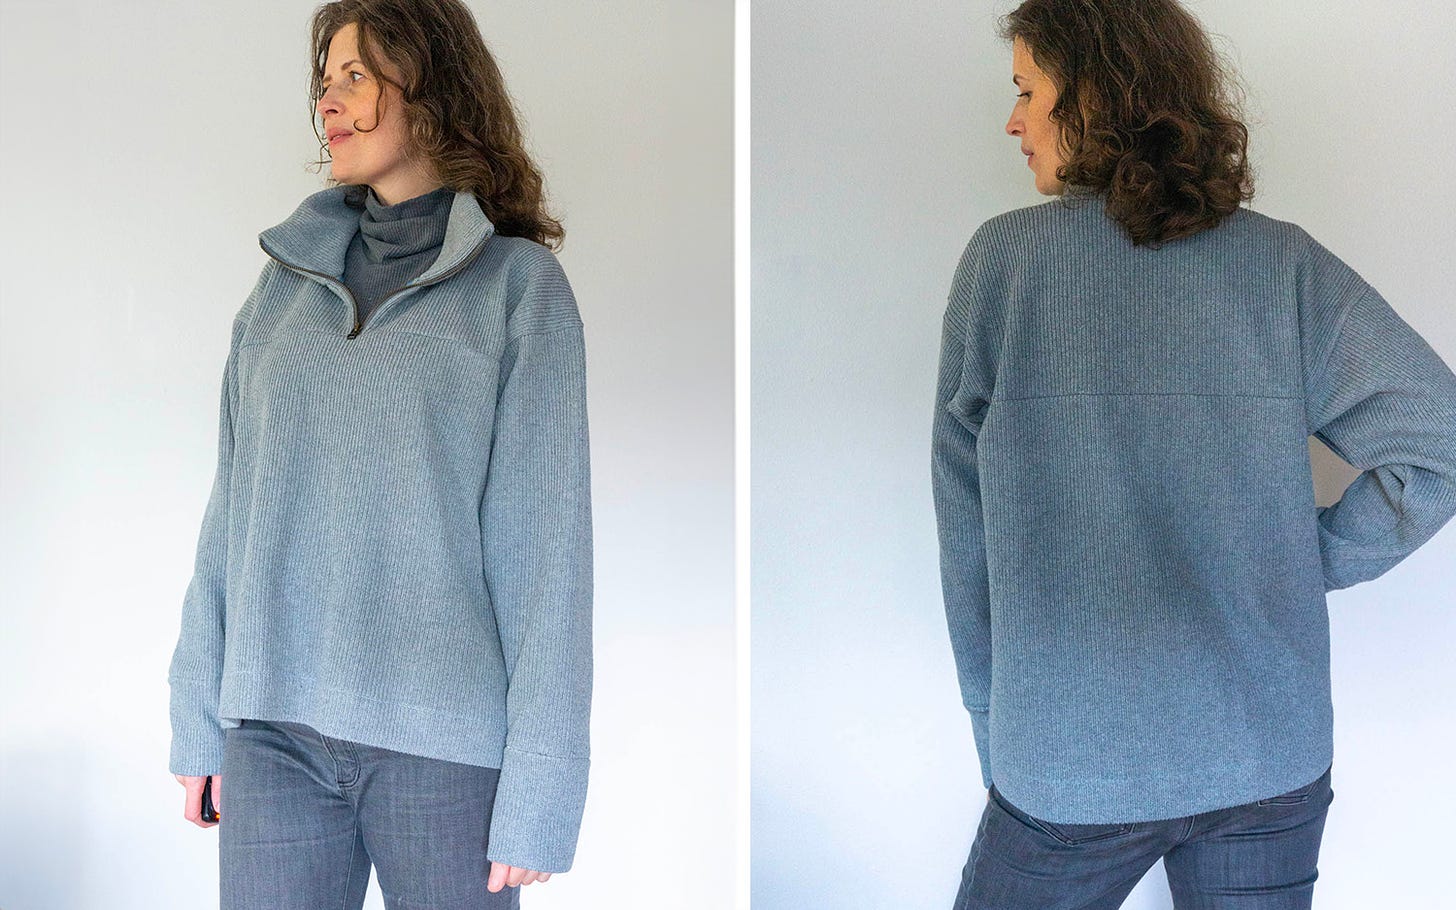
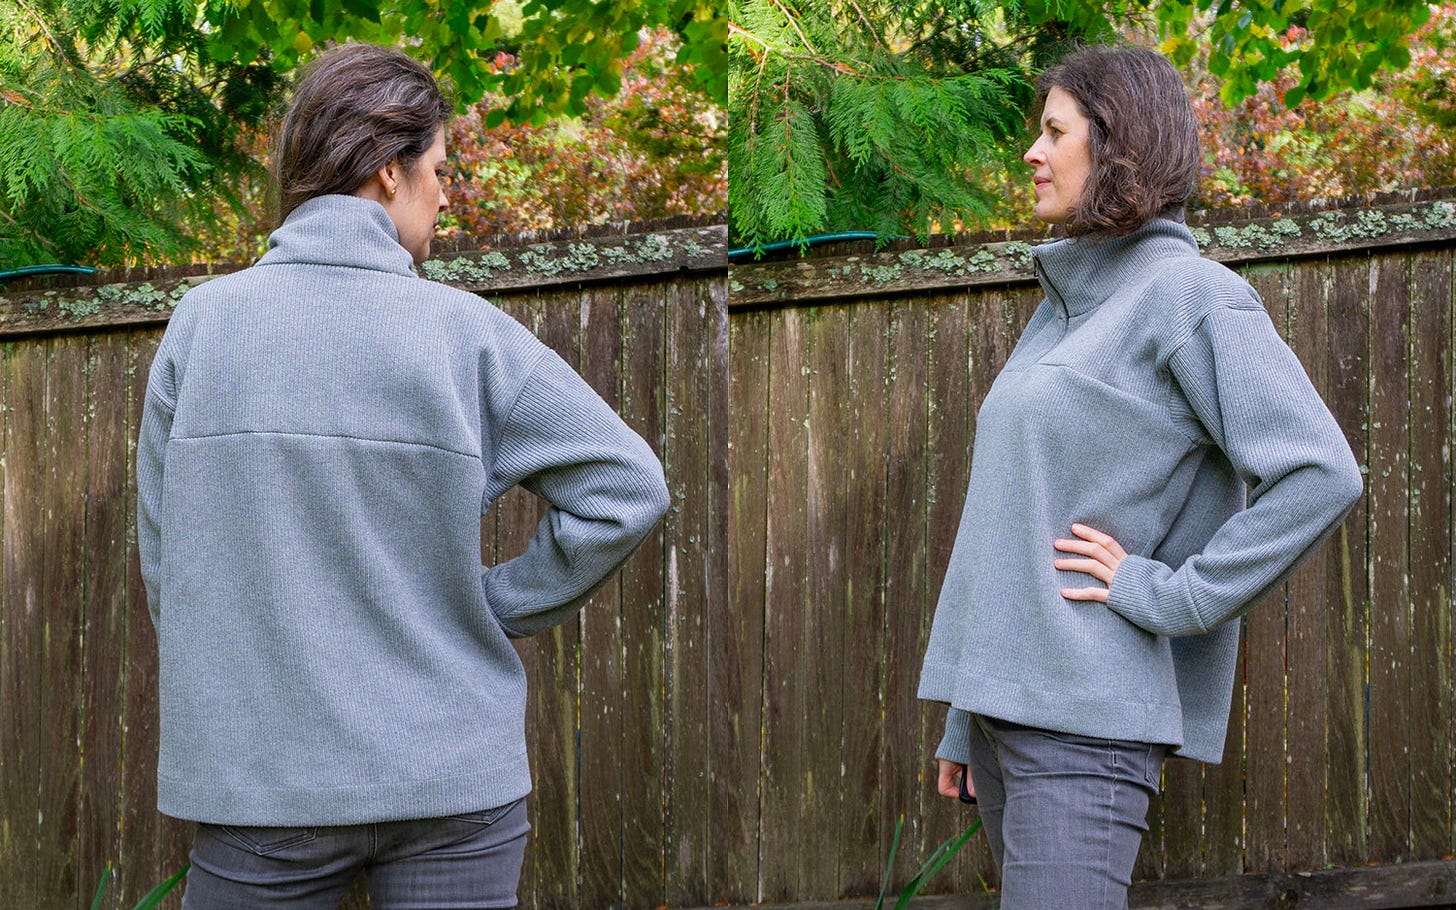
For my pullover, I used a heavy sweater knit and a zipper at the center front. Instead of gathering the hems with stretch knit binding, like in our inspiration garment, I used long cuffs on the sleeves and a 2” folded hem on the body. Also, the collar is folded over at the top edge. The silhouette is a lot boxier than the inspiration and the fabric weight is a lot heavier. Let’s get into the details.
FABRIC & NOTIONS
For my pullover, I decided to use a sweater knit fabric and a zipper instead of a snap placket. It's kind of an upscale version of the sporty L.L. Bean fleece that inspired this project. I love the fleece because of how lightweight yet warm it is. But, fleece is straight up synthetic polyester and for environmental reasons I try to reduce my polyester use as much as possible. (Poly really never breaks down which means it's strong but not good for the planet.)
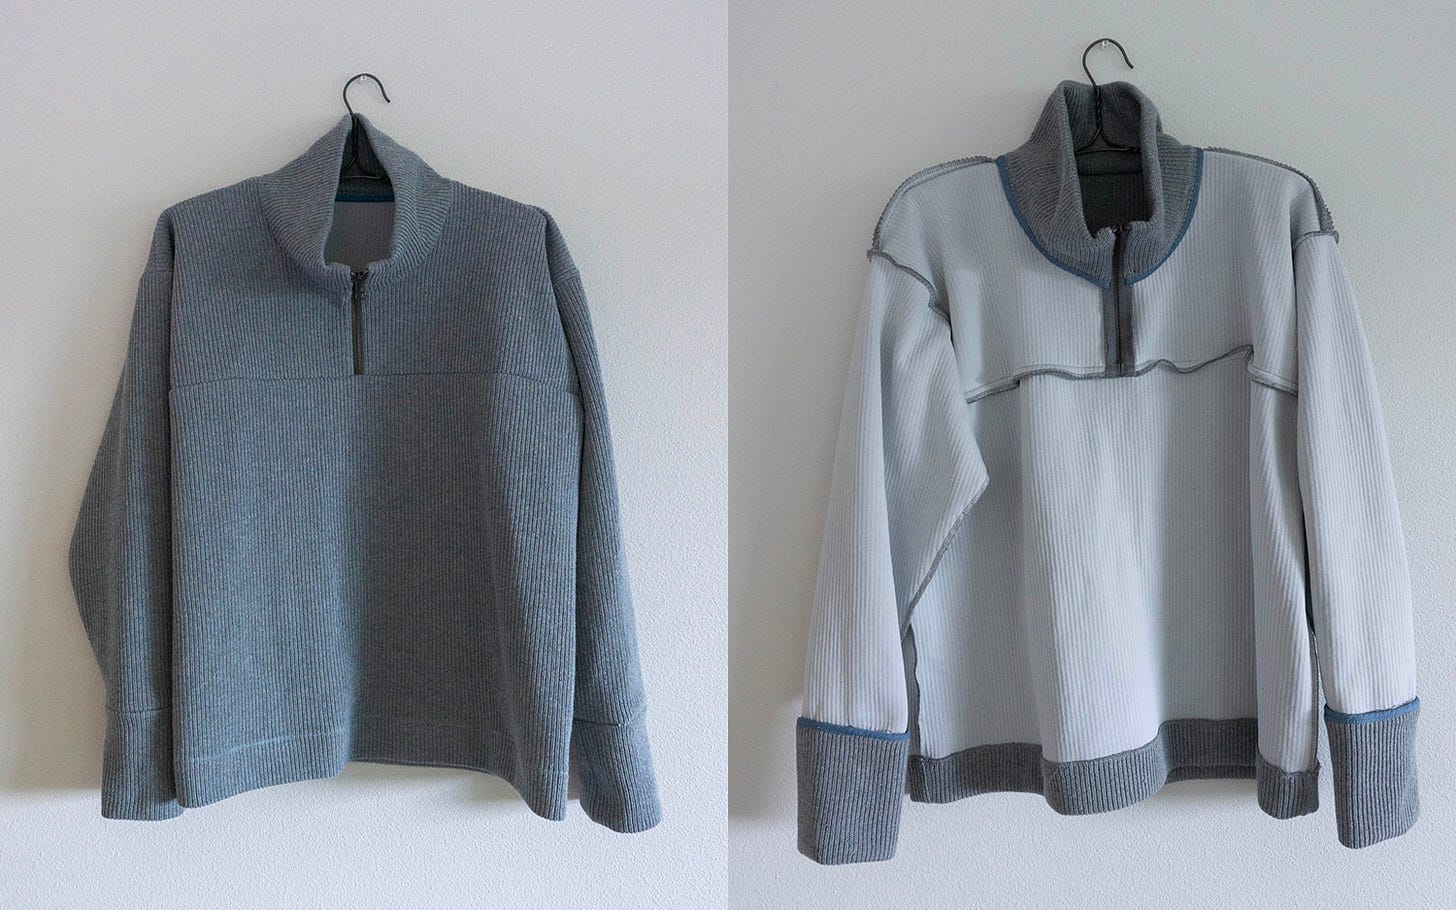
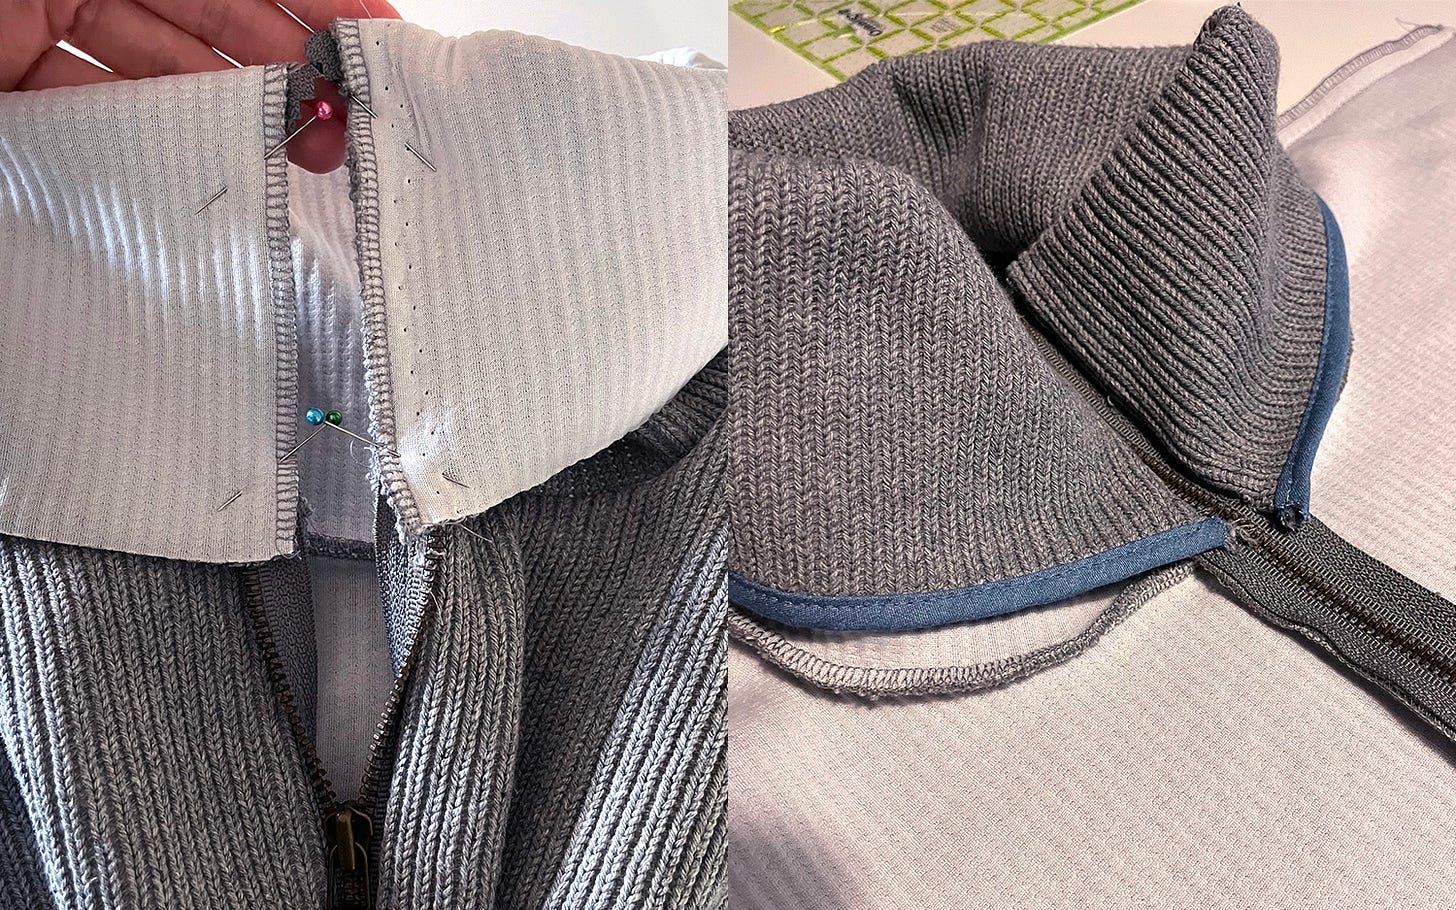
After a lot of searching, I found this sweater knit from Joann Fabrics that's 79% cotton and 21% polyester. I ordered it online and didn't realize that the fabric comes with a built in lining. You can see the white lining in the photo above right. I don't think I would have bought it in store if I knew that. But, I think it makes the fabric VERY stable overall and it was pretty easy to sew. The only issue is that it is THICK and my serger did not want to sew through three layers of it.
I think another great alternative to fleece would be wool, particularly a merino wool knit. (I'm allergic to wool and feel very itchy when it's in contact with my skin so the funnel neck plus wool would be way too irritating.)
One additional note on fabric stretch. Because this top has an oversized fit, I didn't worry about how stretchy the fabric is. (Btw, I'm going to talk a lot more about stretch percentage in our next project :)
Additionally, I used a metal zipper from my stash and some 1.25" wide bias strips cut from cotton leftover from a shirt I made earlier this year. (More on how I used the bias strips later.)
DRAFTING
Below are the measurements/numbers that I used to draft this pattern. I used my inspiration sweatshirt as reference for many of the measurements. Also, I’m a little over 5’11” so my lengths are generally longer than others. And, because I’m so deprived of length in RTW clothes, I like to make my me-mades extra long.
PART 1
A Center To Wrist 28.5"
B Finished Chest Circumference 49"
C Finished Shoulder Length 11"
D Finished Armhole Depth 10.5"
E Finished Neck Width 7.5"
F Front Neck Depth 5" (I decided to make this a little deep because I didn't want the collar too close to my neck. And I wanted a bigger more dramatic collar.)
G Finished Wrist Circumference 10.5"
H Finished Body Length 27"
I Seam Allowance .5”
PART 2
A Front yoke neckline 7.25"
B Back yoke neckline 4 5/16"
C Finished Collar length 4.25"
D Front yoke length 4"
E Finished Placket Width (For this design, I decided to expose .75" of the zipper. So, I removed .75/2=.375" from the center front of each yoke.)
F Seam Allowance .5"
Instead of the snap placket, I decided to use a metal zipper and leave it exposed. I even had a matching zipper in my stash. The zipper measures 8.1” from the base to the top of the zipper teeth (the tape at top and bottom NOT included). My front yoke was 4" so to fit the zipper, I made the collar a finished length of 4.25".
THOUGHTS ON THIS DRAFT If/when I make refined versions of this pattern, I'd like to smooth out the curves at the underarm and the back neck. The curves are a little tight there and while it sews fine it's a little tricky. I also would experiment with how deep to make the front and back necklines, as well as how wide to make the neck opening. Proportionally, with this specific design, I would consider dropping the armhole lower.
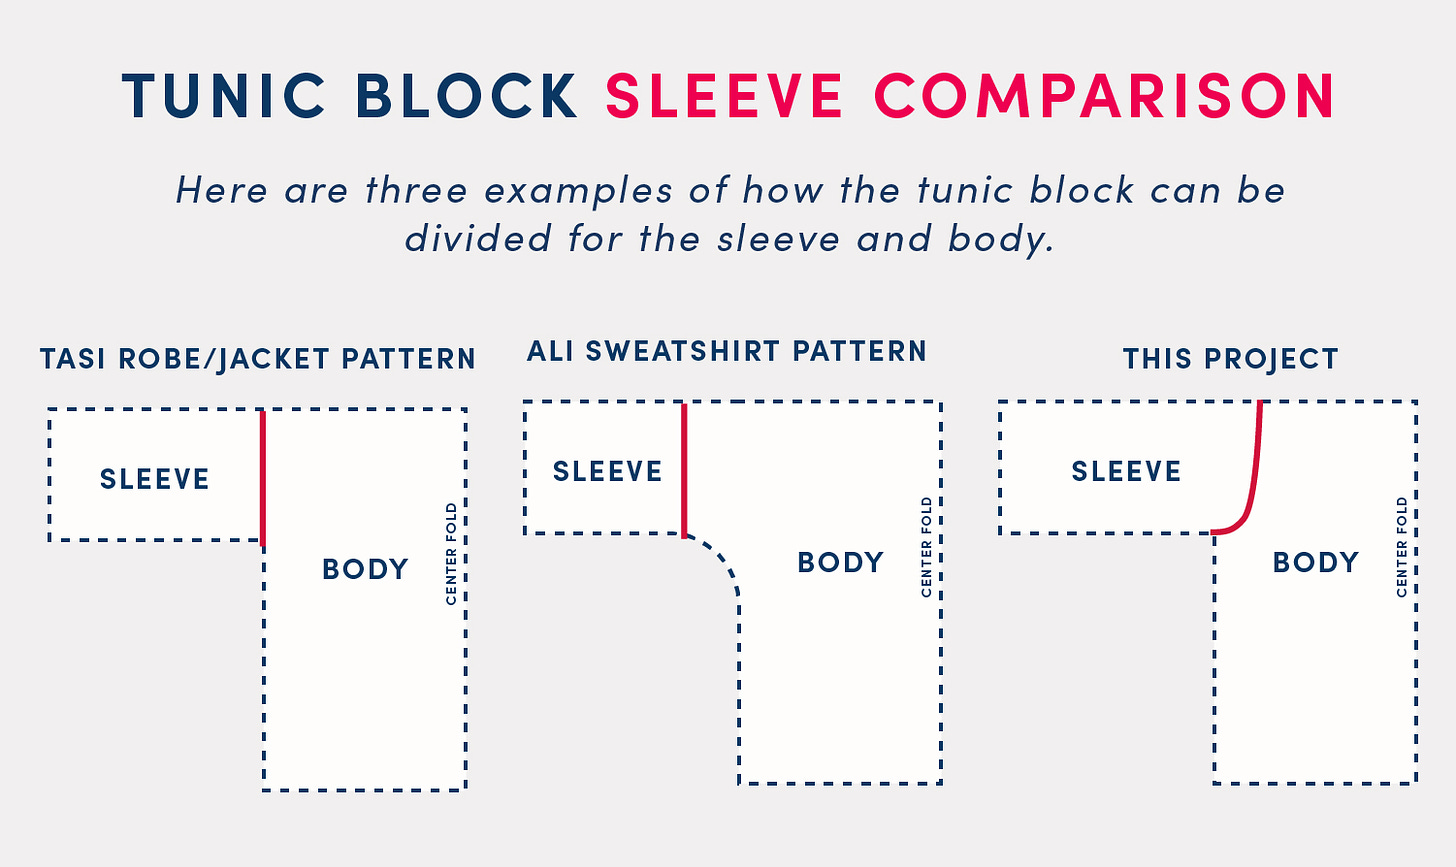
I also wanted to share some alternate ways to use the tunic block. I have two patterns that also use the tunic block but the sleeves are cut differently. For my Tasi Robe and Jacket, the sleeve is cut straight down at the underarm. This is very easy to sew and draft but is tricky when sewing French seams or a Hong Kong finish.
My Ali Sweatshirt pattern cuts the sleeve farther down the arm and has a curve added to the underarm. I think this is the easiest one to sew.
Personally, I think it’s easier to sew the first two examples.
For this project, I cut the sleeve into the body because it matches our inspiration more closely though and I wanted to give it a try. It’s also more similar to a standard sleeve pattern (as opposed to the boxy version in the other two drafts).
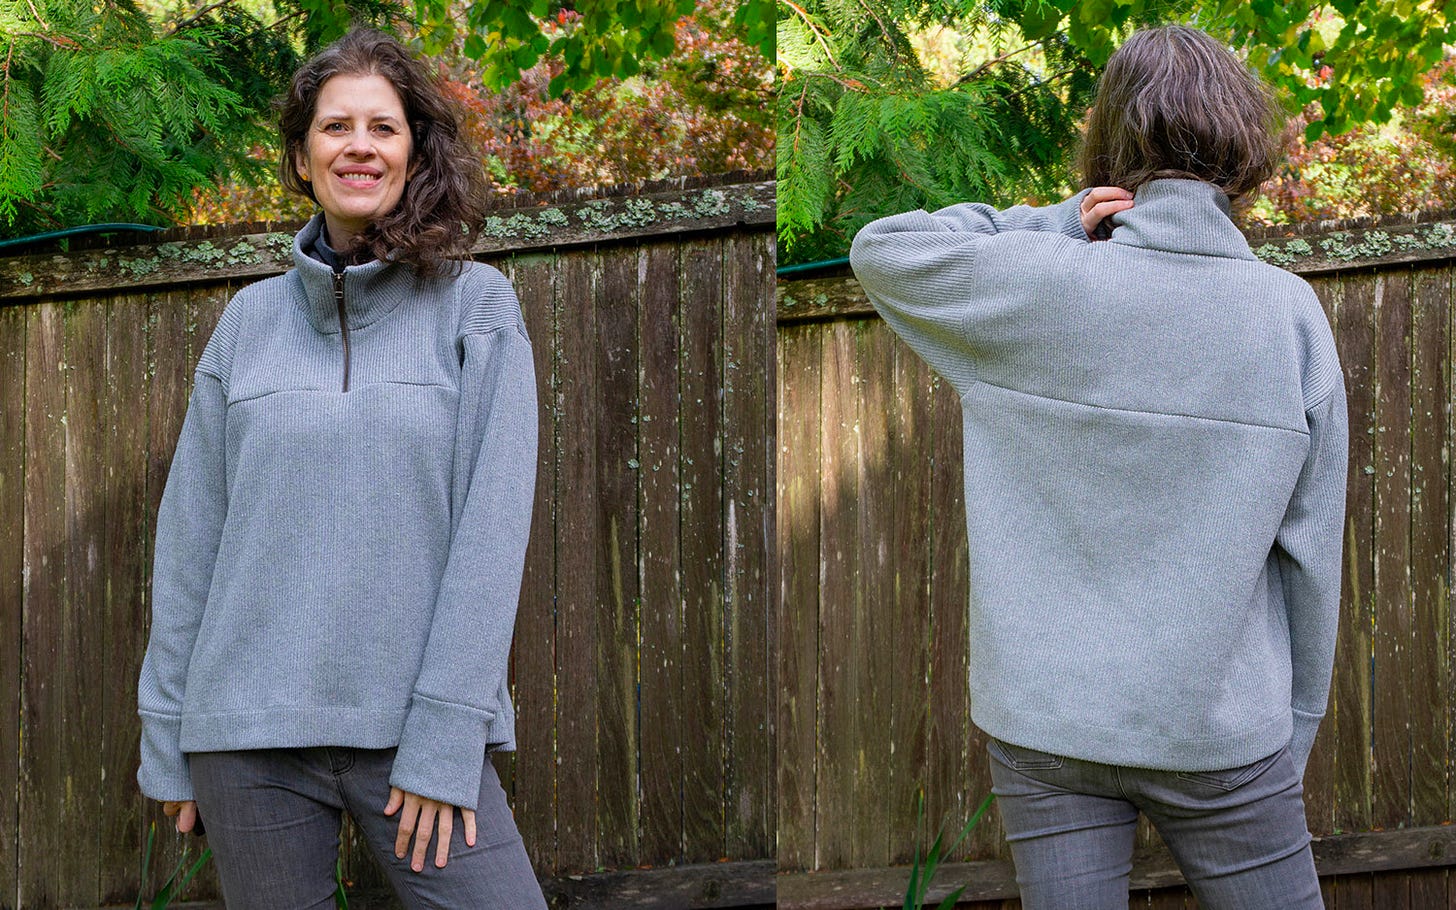
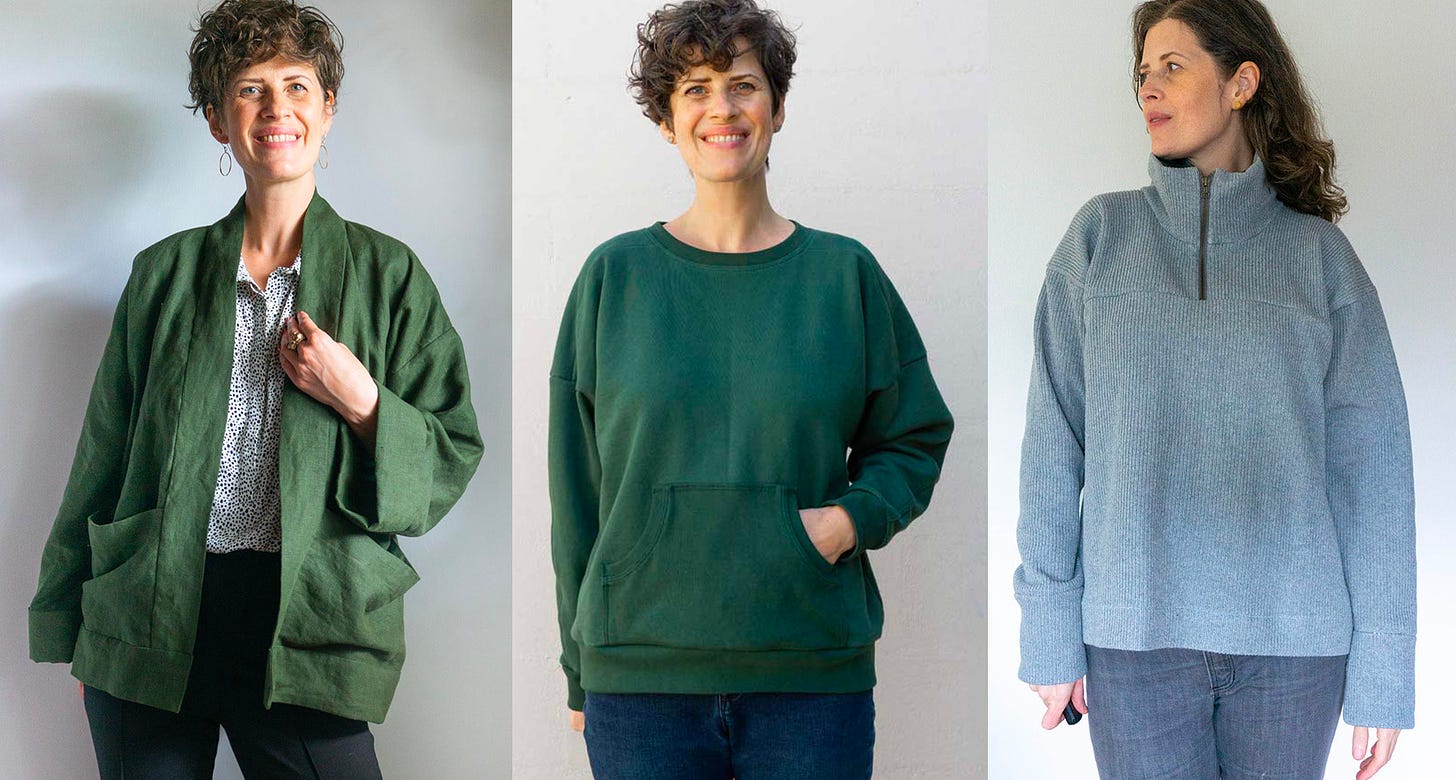
Above, are photos of me wearing each garment. It’s not a one-to-one comparison because the fabrics are different. But it’s still worthwhile, right? :) You can see a fold from the armpit to the shoulder because there is excess ease there. That’s just inherent in the draft. You are unlikely to see that fold in something like a raglan sleeve that is fitted to the shoulder.
When wearing the garments, I do not feel a difference in the fit of the sleeve and underarm. It's so oversized that there's not any constriction in the shoulder. My biggest concern is if the fabric would feel too bulky in the armpit. Dropping the armhole lower and away from the armpit helps prevent that. Sometimes, I find that the sleeves can twist forward. This may be fixed by the forward shoulder adjustment that I mentioned at the bottom of this post.
I'm curious, do you have any personal experience or thoughts on the fit of this armhole style?
CONSTRUCTION
The order of construction for this pullover feels a little bit backwards to me. Usually, zippers and collars are the last thing I sew but because it's only a half zip we need to sew them first. It's not hard, just don't get ahead of yourself.
Below, I list the steps that I took in bold and add some notes for how I constructed this specific pullover.
HOW TO SEW A HALF ZIP PULLOVER
STEP 1: Stitch Back Yoke to Front Yoke at shoulder seams.
I was concerned about bulk when sewing the collar, so I finished the shoulder seams with a serger then stitched this seam with a lightening stitch and pressed the seams open.
STEP 2: Stitch collar to neckline
If you are using a placket and have a thin fabric, you can fold the collar in half and stitch it to the neckline opening. Then, to pretty it up, you can cover the seam with ribbon or tape. The raw edge at the center front will then be finished with the placket.
Because my fabric was so thick, I sewed only one layer of the collar to the neckline. Then, I finished the other end of the collar with woven bias binding. I cut a strip 1.25 inches wide and the same width as the pattern piece. With right sides together, I stitched it to the collar. Then I pressed it to the wrong side and folded in the raw edge. From the right side of the fabric, I top stitched the binding in place.
STEP 3: Attach zipper (or placket)
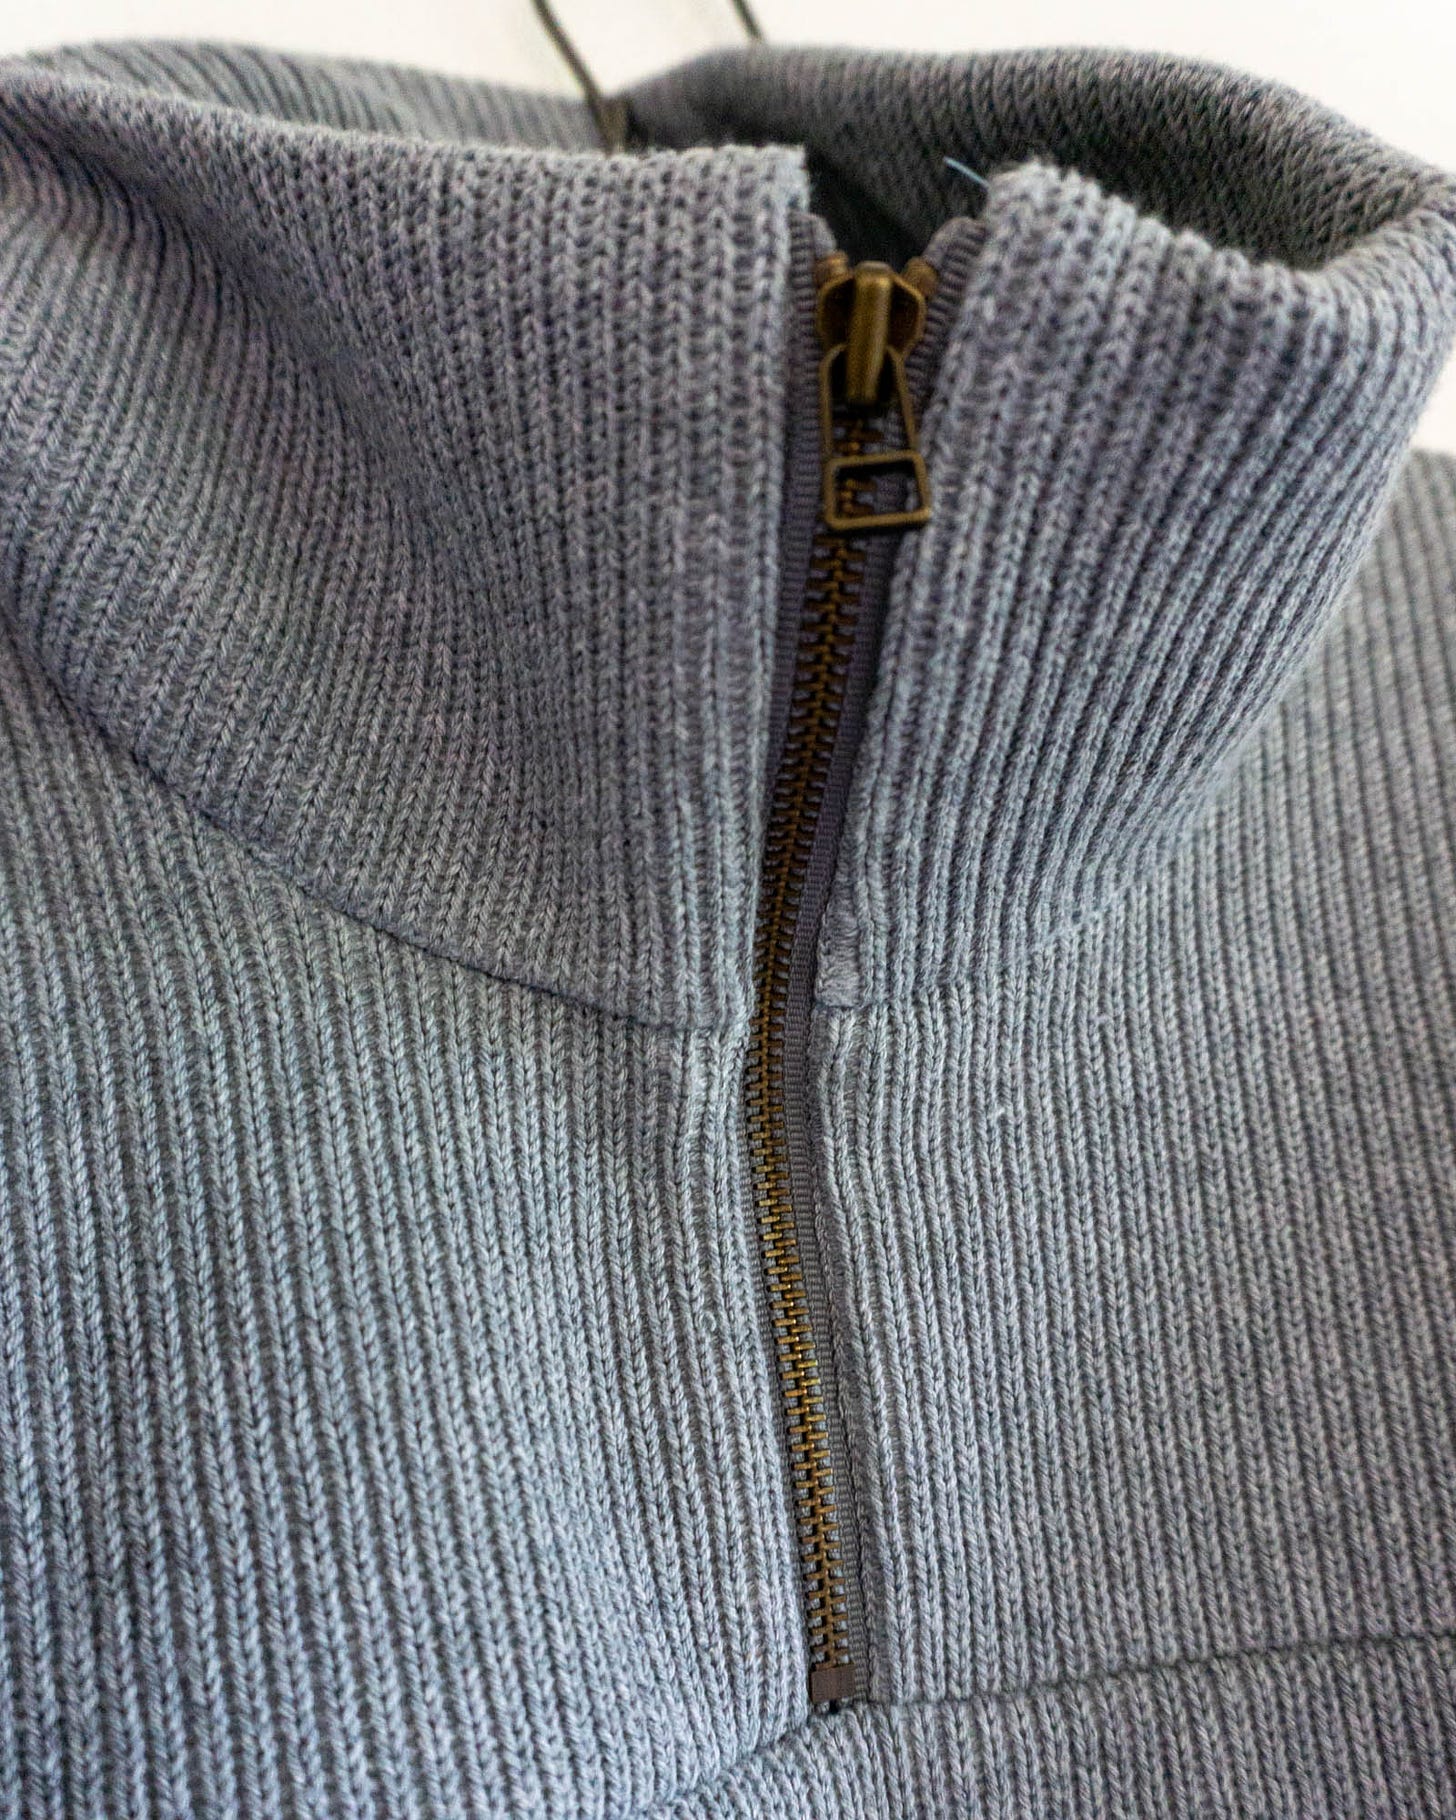
I used wash away Wonder Tape to hold my zipper in place while stitching. You can buy it on Amazon here (affiliate link). In general, I used a walking foot when stitching this fabric but for the zipper I switched to my zipper foot.
STEP 3B: Finish the collar. Fold back collar so it's right sides together and stitch. Top stitch bottom of collar along neckline seam.
Next, I folded the collar so that it was right sides together and sandwiching the zipper. (See photo above left. I took this photo before I decided to use bias binding.) I then stitched through all layers to secure the lining part of the collar.
I then flipped it so wrong sides were together. (See photo above right.) Finally, I pinned the bias bound edge of the collar to the neckline and topstitched.
This technique is similar to sewing a Bias Bound Waistband. I have a tutorial for that here on my other blog.
STEP 4: Stitch Back Body to Back Yoke. Then stitch Front Body to Front Yoke.
STEP 5: Stitch sleeves to body
STEP 6: Stitch underarm seams
I used my serger for steps 4 through 6. No issues! :)
STEP 7: Finish hems.
For the hem of the body, I finished the raw edge with my serger, folded it back 2 inches and topstitched using a twin needle. Click here for tips for using a twin needle on my other blog.
For the sleeves, I decided I wanted them to be longer, so I cut double layer cuffs. This fabric is not super stretchy so I cut the width of the cuff equal to the sleeve opening. My serger could not handle sewing three layers of this fabric. So I decided to bind the edge of the cuffs. BUT the opening was too small to top stitch. So, I hand stitched the binding to the body using this technique. But I think I sewed it too loose and need to restitch it.
FINAL THOUGHTS
I’m really happy with how this turned out and I love the look of the bias bound seams on the inside. I wore this pullover all day yesterday. I added a rain jacket for going outdoors and even when caught in a downpour, I still stayed warm. A definite win!
This heavy weight fabric is great for cooler temps and the boxy fit is really comfortable and easy to layer tops underneath. If I were to drop the armhole lower, it would get more difficult to wear a jacket or coat on top.
I’m very happy with the hemmed rather than gathered hem. The elastic gathered hem tends to ride up but this stays put, keeping my midsection covered and warmer. I also love the extra long cuffs at the wrist. They provide a little extra warmth and protection for my perpetually cold hands. And, I can fold them back to get them out of the way.
That’s it for today! Let me know in the comments if you have any questions. If you’ve sewn your own pullover, I’d love to see it. Before starting our next project, I’m planning a mini bonus post for calculating the length of bias binding that needs to be joined in a circle.
And if you enjoyed this post, you can tap the "heart" at the top or bottom to help other people find it. Restacks and shares help too. :)
Happy mathing!
Beth
You can support this newsletter by subscribing and sharing or check out the links below.
Visit me elsewhere on the web:
Pattern Shop | Improv Quilting E-Course | Instagram | YouTube





I think I bought that same fabric one of those Facebook destash sights. It wasn’t what I thought it was - and will now spare myself the frustration of trying to sew a half zip pullover with it! 😂
However I do have other fabric that would work perfect (I hope)! Can’t wait to give this a try! Thank you!!
This is the first post of yours that I came across and I instantly subscribed. You did this project with so much attention to detail and a real willingness to share your knowledge and process. Thank you so much for all your time and effort, this came out amazing!