


Woven Skirt Variations
Let's look at just a few things we can make using a basic woven skirt block.

Welcome to Sewing With Numbers, a newsletter about sewing, math, design and how to draft your own sewing patterns. Through simple pattern drafting exercises, I'll show you how fun, useful and empowering math can be. ✂️ Posts older than 3 months are archived for paid subscribers. But if subscriptions aren’t your thing, I also have PDF Booklets for older projects in my shop.
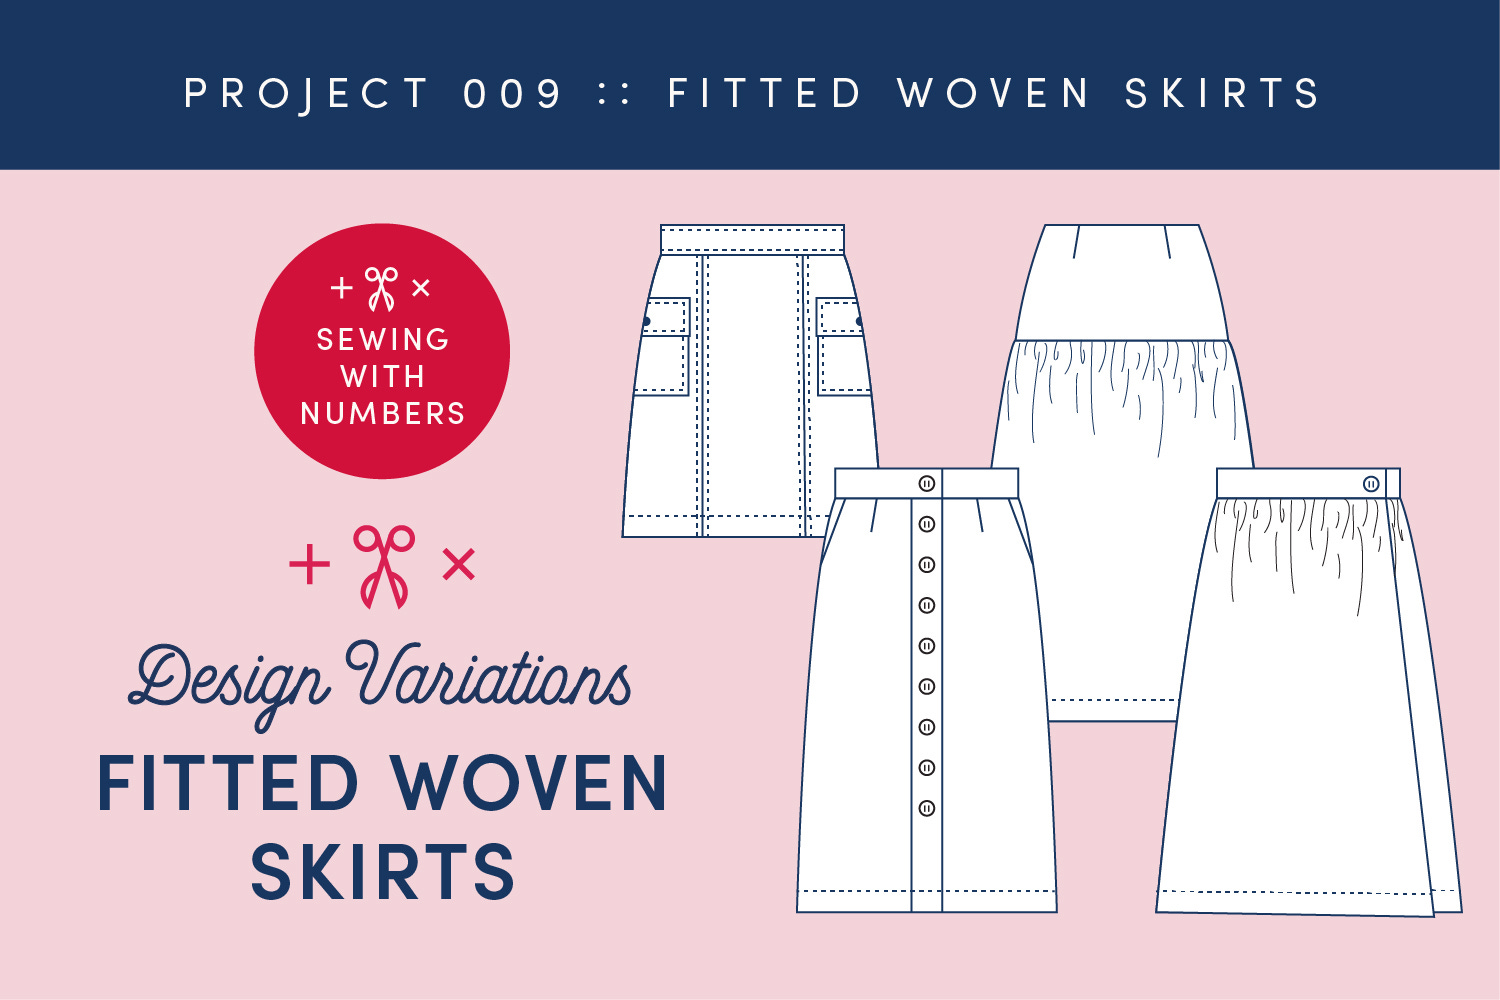
Hello my mathy sewing friends! This week we are continuing Project 009-Woven Skirts with four design variations for the woven skirt. All of these variations use the skirt block that we drafted a few weeks ago. There are really so many possibilities once you have a skirt block that fits. It’s fun to think about.
If you need to catch up on the previous posts in this series, links are below.


Design Variation 1—Cargo Mini Skirt
Our first variation is a cargo mini skirt. Cargo skirts are all about the details—seam lines, topstitching and pockets. (In retrospect, I’d probably add belt loops to this design.) To draft this pattern, I’d start with the basic block and cut through the middle of each dart from the waistline to the hem. Instead of sewing darts, you can sew princess seams to create the shaping at the waist. The center front and center back can be cut on the fold. And because it’s a mini, you don’t need a slit in the hem. I’d draft the waistband just like we did for the Pencil Skirt. Finally, you’ll need to draft the pockets, pocket flaps and other decorative details.
Design Variation 2—Gathered Wrap Skirt
This is a really simple design and you could even just use rectangles for the skirt front and back. You’ll want to start with the Front and Back Waistband pieces that we drafted for the Wrap Skirt.
Back in Project 001, I shared about gathers and the gathers multiplier. To create the Front and Back skirt pieces, you’ll want to select a gathers multiplier and multiply it by the finished width of the waistband pieces. Then extend the width of the skirt to equal that new width.
For example, let’s say the Front Waistband Width is 20” and the Gathers Multiplier is 1.5. Then we multiply 1.5 x 20” for 30”. So, we need to make the Front Skirt seamline 30” wide plus the seam allowance.
Project 001: How to draft gathers

Hello friends! Today we're digging into how to draft gathers. This post is the second exercise in our Elastic Waist Tiered Skirt project. If you missed our first exercise—How to Draft an Elastic Waistband, you can read it here.
Design Variation 3—Gathered Skirt With Yoke
I really like this design and if I can find the time, I’d like to sew it. I recall making a skirt like this back in the early ‘00s with a pale yellow butterfly print quilting cotton. Anyway, this design has no waistband and is finished with a facing. I would use an invisible side zip as the closure.
The yoke is cut from the Skirt Block by cutting a horizontal line at the mid-hip. The gathered skirt is created by applying a Gathers Multiplier to the width, just like in Variation 2.
To create the Yoke Facing pattern piece, you could use the Yoke Pattern piece and have the entire yoke lined with the facing. (This would create a very clean interior finish.) Or, you can create a smaller facing, as shown in the illustration above. To make the smaller facing, trace the top waistline edge of the Yoke. I like a facing to be at least 2.5” deep. Then to reduce bulk, I’d cut along the dart lines and then tape the two pieces together. There’s an illustration of this at the end of the Pencil Skirt Tutorial when I show how to draft a curved waistband.
If you want an elastic waist variation of this design, check out this tutorial from Project 001.
Design Variation 4—Button Front Skirt
For this variation, the zipper is replaced by buttons all the way down the front of the skirt. Plus, there are angled cut away pockets at the front waist. I might be in the minority, but I’d much rather sew buttons than zippers.
The waist band can be drafted the same way as for the Pencil Skirt. The pocket lining and pocket bag are drafted using the same process that we used for the Scooped Pocket Skirt tutorial, just with a straight line instead of a curve.
Ok, so we’ve drafted those elements before. But we have not drafted a grown-on button placket yet! To create the button panel on the skirt front, you’ll first want to decide how wide you want the button placket to be. Let’s call that “X”. The center of the button placket should be the center front of the pattern, shown with a red dashed line above.
The placket is folded to the wrong side twice. One fold equals the width of the placket. The second fold equals the seam allowance “Y”. To draft the placket extension, add 1.5X + Y to the center front of the skirt.
For more visuals on how a placket overlaps, check out this post from Project 004.
I hope that you enjoyed this tutorial! Please let me know in the comments if you have any questions.
There are lots of ways to support this free content:
Tap the "heart" at the top or bottom
Share or “restack” the post to help other people find it.
Become a paid subscriber
Visit one of the links below.
Sewing With Numbers Drafting Manuals are now available for purchase.
Pattern Shop | Improv Quilting E-Course | Donate at Ko-Fi | YouTube
Happy mathing!
Beth
Such delightful adaptations! My sewing room is being renovated and I am itching to get back to sewing!
This is so so helpful! Dying to try the gathered skirt with yoke! Thank you for sharing